 NSB
All Systems Installer Creator
  NSB
All Systems Installer Creator
Let us go directly to the point. What this program may do for users?
Reading several messages of the NSB Group it is clear that the users of
this language need an installer's program that is easy to use giving them
as result a package that could install all the files that their programs
need to run in a single step.
INFactoryW_2003 does all the above requiring user to know only:

-Program's name
-Author's name (you)
-Device Operating System
-CPU Type (Only if you do not use ALL option)
-Additional files' path on the device (if any)

The program uses the standard way to work (i.e. Cab files,Ini files) and
add the possibility to create a compressed autorunning exe installer if
used with EzSetup (under Win2000 and over only).
You must consider INFactoryW_2003 as an installer developing enviroment to
which user must add additional files that usually a programmer can easily
get and that are:

-CABwiz.exe
-EzSetup.exe
(NSBruntime)Basic.exe,MSCEfile.dll,MSCEPicture.dll,DialogX.ocx,regsvrce.exe
(eVBruntime for Mobile2003 only)Pvbform2.dll,Pvbhost2.dll,Pvbload.exe,
                Pvbdecl.dll,Pvbctrl.exe,Pvbkill.exe,Vbscript.dll

NOTE: This files are not included in the zipped distribution file of my  program as
           well known to registered users of the language or easily available on net.
           into the new MS eVB runtime   -     If you wish to learn how to get them See HERE

When you collected all files you need, you must store them into the folders
that, unzipping program, are authomatically created on your HD.
The folder names recall the OS/CPU to use (example: PocketPC_ARM)
You MUST store into each folder the same files otherwise you will be unable
to create a single MultiCab installer for different CPUs
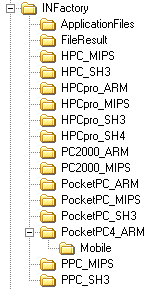
The folders'tree will be shown as at side.
You do not need to fulfill all the folders
(You may leave PPC and HPC folders empty if
you planned to not use this O.S., but you
must remember, in this case, to not use the
option ALL Devices.)
The users of the previous version will note
a new subfolder named 'Mobile'.
This is the only one that does not need to
contain the same files stored into the others
folders. You will store therein the eVB files
that are required for Mobile2003 system.
When you finished to load the required files
your are near to have INFactoryW2003 operative.
The above operation must be made the first
time only but, obviously, you can add all the
Dll, Ocx files you need at any time.
We can now see the use of the main folders:

-INFactory
 You have to copy in this folder the file CABwiz.exe and you will
 find here, after the use, the file .inf created in the form
 [YourProgramName].inf
-ApplicationFiles
 In this folder you must copy your .nsb program file and all the
 additional files (images,sounds,help,data etc) if any.
-FileResult
 As the name says you will find here the Installer created.
 Into this folder you will find a Setup.exe file and also
 the Ezsetup.exe file must be stored herein.
 If you can use Ezsetup you must store here also two text files
 Eula.txt and User.txt that you will write with the terms you
 like. (you may change the names but the format must be Text)

NOTE: As several time written the so easy use of Microsoft installer is due to its
           integration into the programming system so to get a similar easy use i have
           to ask you to perform, on starting the above mentioned actions.
           If you do not like this you can use other kind of installers but in this case
           it may be that you will need to give to the program a lot more of informations
           so the learning time to use program could be longer than the one required to
           find and copy some files into the relative folders.

After reading and executing the above you are ready to run and
use INFactoryW_2003.

This is the FIRST window of the program when you run it:
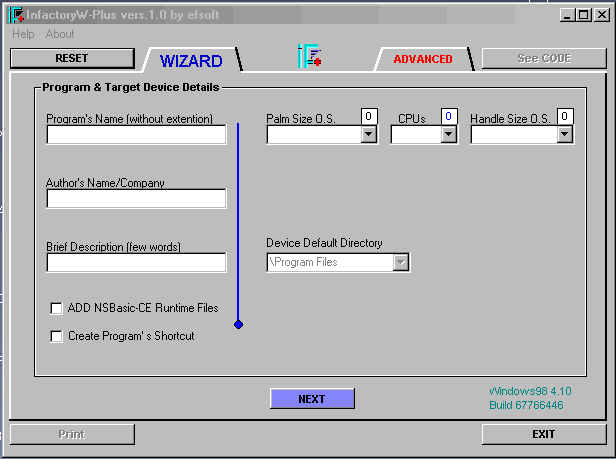
The user can see that the starting wind has not been changed except for the missing checkbox used in the previous provisory version to use Mobile2003. and two little label which use will be explained later. Are always available the two TabLabel to select if use the WIZARD mode or the ADVANCED mode. The First one can be used only with standalone programs and accept as additional files dll or ocx only. The advanced mode allows user instead to add others types of files also (images,sound,helps etc) and to select the path where to install them on the device.Before starting select, by a click, the operative mode to apply thence to use this first window you must only: Type your ,nsb program's name without extention in the 1st input Textbox Type Author's or Company's name into the 2nd input Textbox Type a brief program's description (optional) in the 3rd input Textbox thence you have to Use 1st CheckBox to Add NSBasic Runtime (select to add all needed files) Use 2nd CheckBox to create Program's schortcut (select it if requested) Now select the Operating System and the CPU's type following these rules You may create Single O.S. Installer for a single CPU > PocketPC4_Arm.Cab (select 1 O.S. for your device thence 1 CPU type only) ( PocketPC_Arm.Cab Multiple CPU installer for single O.S. > ( PocketPC_Mips.Cab ( PocketPC_SH3.Cab (select 1 O.S.for your device thence the ALL option for CPU) ( PocketPC4_Arm.Cab ( PocketPC4_Mips.Cab Selected O.S. for multiple CPUs ( PocketPC_Arm.Cab ( PocketPC_Mips.Cab ( PocketPC_SH3.Cab (select 2 separate O.S thence the ALL option for CPU) ( PocketPC4_Arm.Cab ( PocketPC4_Mips.Cab Global multiple O.S. for multiple CPUs ( PocketPC_Arm.Cab ( PocketPC_Mips.Cab ( PocketPC_SH3.Cab ( PPC_Mips.Cab ( PPC_SH3.Cab (select 'ALL devices' O.S. option thence ALL option for CPU)
doing this you must remeber -YOU CANNOT CREATE MIXED PALM SIZE AND HANDLE SIZE DEVICE INSTALLERS -The little label on top of the Combo boxes will show how many O.S. and CPUs you are using even if the combo text will show last selection. Below the ComboBoxes line you find a further ComboBox as here shown:
You may use it to modify the Device Install Directory that is by default - \Program Files -. It is anyway strongly suggested to add to the default dir a SubDir using your program name (for example \Program Files\MyProgram). Doing this any program of yours will be installed into a SubDir so named under the Folder Program Files. AT this point the beaviour of INFactory will be different if you selected WIZARD or ADVANCED How to go over if WIZARD option has been selected:
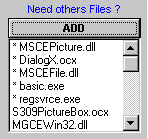
You will see at side of the ComboBox showing Device Default Directory a Button captioned ADD that open below a list showing all the available Dlls. You may click on their name to add the libraries to your installer. Note that the dlls marked by a '*' have beem already added to the installer by the program authomatically. Remember that,as any subDir must contain the same files the new selected Dll/ocx will be added to any Cab files that will be created. The limit is that in this case you will see and you will be able to add Dll/ocx only. If your program does not need any additional library ignore the ADD button. As soon as finished to complete the first window of INFactoryW_2003 press the button(You may now see the INF file code using the button on top right corner with caption SEE CODE now enabled.(Use the same button to close code's window). Otherwise click the new button shown under the NEXT button that has been disabled in the meantime and looks like the one below
Clicking the 'Create CAB file' command you will see one or more DOS windows flashing on the screen to confirm you that CABwiz program is doing its job, thence the same button will change its caption in 'Create INI file'. Click on it to finish and go to see into FileResult folder where you will find the CAB files and the Setup.ini file you need to get the installer package. NOTE: The Wizard option allows to use the files created with the file SetUp.exe that you find included in the FileResult folder. This means that in this case you will be unable to use Ezsetup program to get a compressed autorunning installer even if you use win2k or over. ************************** If your program needs not only additional libraries but also others kind of files as images, sounds, dat or help files etc and it needs also to load the into a device' folder that is not the usual Windows or Install folder you have to choice the ADVANCED option. How to go over if ADVANCED option has been selected: In this case, as soon as selected the Device Defauld Directory in the relative ComboBox you will not see the ADD button but you have to click the NEXT button immediatly. This will show you the second window of the program INFactoryW_2003 that looks like this:
NOTE: You can note the list of files on the right shows strange paths. This is due to the ALL option selected for CPU type that allows the program to authomatically apply only the CPU working with the selected Operating System. You may also note that the O.S include also Mobile2003 because the eVB files have been added to the list along with the NSB runtime files.
On top of this second window you can see a line of InputTextBoxes like thisin the line you can see 3 Group each with its Icon. A means Application Folder W means Windows Folder ? means Optional Folder and will be changed if you use it. We may assume that the program for which you are creating the installer uses some Bmp files that must be copied into the MyDocuments folder of the device. If you check the textboxes line you will find the bmp extention but as explained above this extention is (by defauld) linked to Application Folder. So highlight and cancel the bmp textbox then go to the first blank box in the Optional folder and type here the extention bmp (ATT. bmp not .bmp) You will get a Boxes line like the following:
After changing the default path for the files with bmp extention you must select the real Path to use for this files. Click on the label ' ? ' and you will see this
Dropdown the ComboBox list and you will find few folders' paths. Select here '\MyDocuments' and click on the 'add' button to get this result
The letter shown can be different if you choice a different path, while it will be X if you use your customized path typing it directly in the ComboBox text window. We can go now to see the below to see the files'list on the left of the window showing on top to buttons 'Other Files' and 'Sys Files' as below
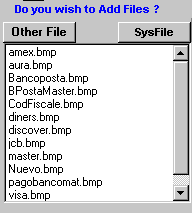
Show the additional files used Show the System Files like by your program that you loaded dlls,ocx or exe files,some into the ApplicationFiles Dir already added, and others to create the installer. that you may wish to add. NOTE: If you added some extentions of files not included in the one shown as default you must click Other File button to refresh the list before selecting the files to add that otherwise will be not shown in the relative list. This not need for SysFile list. Click on each file's name you wish to add. You will se a confirmation window. If you click OK therein the File's name will be shown into the project List on the right. Continue until all the files your program needs are shown in the list on the right thence click NEXT button. While the window on the screen will remain about unchanged the lists that are in the middle of the window will look as follows:
You have nothing to do in this new view. Only check that all the files on the right have the mark <-+ at the end of the line. This means that all the files have been duly linked to their final path to be copied, loaded and registered on the CE devices. Note: If the mark <-+ is missing somewhere this may be caused by a wrong use of the program but also to a bug that i was unable to verify. Please inform me at efsoft@inwind.it Click NEXT again to see the Third window of INFactoryW_2003 program.
This window may easy to use if you select only the kind of the output required for the installer. The DEFAULT option will create a set of files to be used with the enclosed Setup.exe file that you will have to compress using Zip or Rar or others programs to get the installer package. The EZ Cab Files option instead will allows you to get, if you are working under NT/Win2000, a compressed autointalling exe file by an additional window of INFactoryW_2003. (Infactory check authomatically under which kind of System you are working) If you wish or you need instead to use also the above shown registry's keys editor the use can become more difficult. I suggest the use of it to the really advanced user that know well what he is doing and can check if the resulting keys are correctly written in the code. A separate help will be posted to explain the use of this tools in addition to the instructions already written into this window. After selecting the output type click NEXT again and you will see....
Take note that, as already written, before to use the 'Create CAB file' you can check the file INF just created using the button 'See Code' on top right corner.You will see an image like this one.
If all is in order or if you do not know the INF file sintax then click directly the command button 'Create CAB File' You will see some flashing DOS windows as shown below
at the end you will note that the button caption is now 'Create INI file'and clicking on it the behaviour of the program will be different again. A)If you are working under Win98 and you selected obviously the Default output you will see both NEXT and Create INI File buttons are now showing the word 'DONE' so you can only exit from the program and go to the ResultFile folder to get the files you need for the installer. B)If you are working under NT/Win2000 the third window of the program INFactory will remain unchanged on the screen as above except for a button with the caption 'Call EZsetup' that you will see now enabled. Click on it to reach the fourth (and last) window of the program that will be shown like the following:
In this window you have only to select the User text file and the Eula(licence) text file and to click the command button with caption 'Create EXE setup' NOTE: The above mentioned text files may have any name you like but the format must be strictly Text type You must create them before starting to use the INFactory program and to store them into FileResult folder that is the same where the Ezsetup.exe file must be copied to have program operative. When you clicked the button you will note a Dos Application icon to appear minimized in the status bar of your screen when this icon will be no longer visible EXIT from INFactoryW_2003 program a you will find in the ResultFile as usual the [YourProgramName]setup.exe file compressed installer. And that is all. Go here to DOWNLOAD INFactoryW2003 I can assure you that to write this page, that i hope may be useful, it is more difficult than create an installer using INFactoryW_2003. I tested the installers on a H2210, HP565, Ipaq3130 and an Aero1550. Obviously there are a lot of devices using different O.S. and CPUs so it is very difficult and will require a long time to test the program in any possible condition. Any your feedback will be greatly appreciated.