indietro/back
![]()

Le novità ?
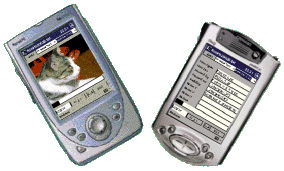
Bene..... l' interfaccia è simile a quella del vecchio RemMe ma io non considero
questo programma un semplice aggiornamento.
Molte parti del codice sono totalmente nuove e la GUI è stata ridisegnata per
sfuttare completamente lo spazio (poco) disponibile con nuove caratteristiche.
La routine per la password sono state migliorate. (troverete i dettagli di seguito)

Sistema richiesto.

Per usare il programma è necessario:
DESK Computer con Win 95/98-Win98SE-ME- Win2000 ed anche XP (non provato).
Opzionale
Per il Viewer o la versione RemMe CE autonoma:
Unità CE con WinCE 2.11 - WinCE 3.00 - HPC or HPC Pro e anche PPC2002
 (Non provato attendo l'arrivo delle nuove unità in Italia)
Qualsiasi CPU come ARM, MIPS, SH3 (quando tutte le versioni saranno disponibili)
Ovviamente sulle vecchie unita CE il programma girerà più lentamente.

GUI rivista e nuove caratteristiche.

Nella zona di input dati (parte alta dello finestra) è stata aggiunta una nuova textbox
per consentire all'utente di inserire i testi della propria classe di documenti (nome
classe, titolo record e nome dei relativi campi).
In questa versione potete aggiungere 7 classi di dati completamente personalizzate
Le classi aggiunte possono essere anche cancellate ma solo se non contengono
alcun record. Esistono sempre 3 classi di default, delle 10 possibili.
Esse sono Carte di Credito, Doc.Personali e ora anche la Classe 'Fotografie'.
In questo ultimo caso potete caricare anche le vostre Foto e le relative informationi e
rivederle semplicemente richiamando il loro titolo.
Potete usare immagini Bmp, Gif o Jpg che saranno riprodotte correttamente se hanno
la misura standard di 10 x 15 cm (la disposizione verticale o orizontale è automatica).

Ho sempre pensato che una immagine spiega qualcosa molto meglio di
tante parole così guardate QUI come funziona il programma

Dati Criptati e password

Il programm usa ora un nuovo sistema di criptazione a chiavi casuali e di conseguenza
un nuovo schema di gestione archivio non compatibile con gli archivi vecchia versione.
(Mi spiace ma erano troppo limitati). Il codce della password è stato riscritto e adesso
dovrebbe funzionare senza problemi in ogni condizione.
E' stato inoltre unificata la routine di password per le unità PPC e HPC.

Sinchronizazione con le unità CE.

Il programma Desk può sempre essere sincronizzato con una unità CE tramite Active
Sync di Microsoft se volete usare il relativo viewer CE. Questo anche avete inizialmente
istallato il programma Desk come standalone. Il sistema sembra funzionare meglio ma
no escluderei qualche difficoltà nel sincronizzare più unità CE diverse.
Installation
Si può istallare RemMe2002 in due modi.

Il primo se si vuole usarlo su Desk Computer soltanto.
In questo caso basta solo copiare uno dei file exe (_5 for Win95/98/Me _6 for Win2000)
contenuto nel file Zip nel computer in un folder qualsiasi o in uno creato appositamente.
Copiate nello stesso folder (Dir) tutti gli altri files contenuti nel file Zip eccetto l'altro .exe
Avviate il programma, ignorando l'avviso di inserire il path della Directory Sincronizata, e
lasciate in bianco la relativa combobox. Inserite la vostra password e confermatela.
Quando in alto al centro vi appare la Combobox che contiene le 3 classi di default dei
documenti la istallazione è completata.

Il secondo è una variante del primo se vogliamo sincronizzare il programma Desktop con
il relativo viewer per unità PPC/PsPC o HPC.
In this case load the required exe file and the help, run it but, when prompted, select
the sychronized directory of your CE unit among the one shown in the drop down combo list.
Insert your new password. (and on desk machine the program is already running as above)
Copy the bmp files in the synchro folder. Connect now your CE unit by Active Sync.
Install first the NSB runtime. (Do not be afraid of its dimension.Only the files you needs
will be loaded). When the runtime has been loaded use the setup file to install the viewer.
Follows the instructions shown on your CE display and, if all is ok, you could tap the
program icon to see the RemMe viewer.
Type on it the same password used on the desktop and if you will see the list of the basic
class of documents shown in the combobox on top of the screen the installation is done
and you can use immediatly the viewer because in the meantime Active Sync has
synchonized the bmp files and the Archive library with your CE unit

2  NOTE ABOUT THE ISTALLATION

On the CE unit the NSBasic Runtime must be installed. Someone can ask why i used
NSBasic instead of eVB for this program. There are two basic reasons. First NSBasic handles
better the object arrays and menu's code for any CE version used, it is a bit quick and the
runtime adjust authomatically on installation the file you need for your CPU, without the
need to compile a single application any unit CE and CPU used.
USE THE PROGRAM
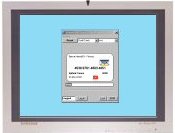
When you use the program the first time you will see on the screen a windows like this.
You will see this on the Desktop version only as the viewer use its own syncronized folder
only it will not ask you any additional information.