
Infinity77


Freeware
- Shipped With wxPython
- Unofficial Widgets
- BalloonTip
- ExtendedChoice
- EnhancedStatusBar
- ToasterBox
- SpeedMeter
- AdvancedSplash
- ShapedButton
- PieCtrl/ProgressPie
- NotebookCtrl
- FloatSpin
- ThumbnailCtrl
- PyAUI
- PyProgress
- KnobCtrl
- FourWaySplitter
- RulerCtrl
- LabelBook
- FlatMenu
- WindowTree
- WidgetStack
- HyperTreeList
- PyCollapsiblePane
- CubeColourDialog
- AquaButton
- GenericMessageDialog
- GradientButton
- MultiDirDialog
- PeakMeterCtrl
- SuperToolTip
- AUI
- UltimateListCtrl
- RibbonBar
- PersistentControls
- XLSGrid
- Applications
If you have any request, or you would like to know how I built some of these software and interfaces, please feel free to drop me an e-mail.
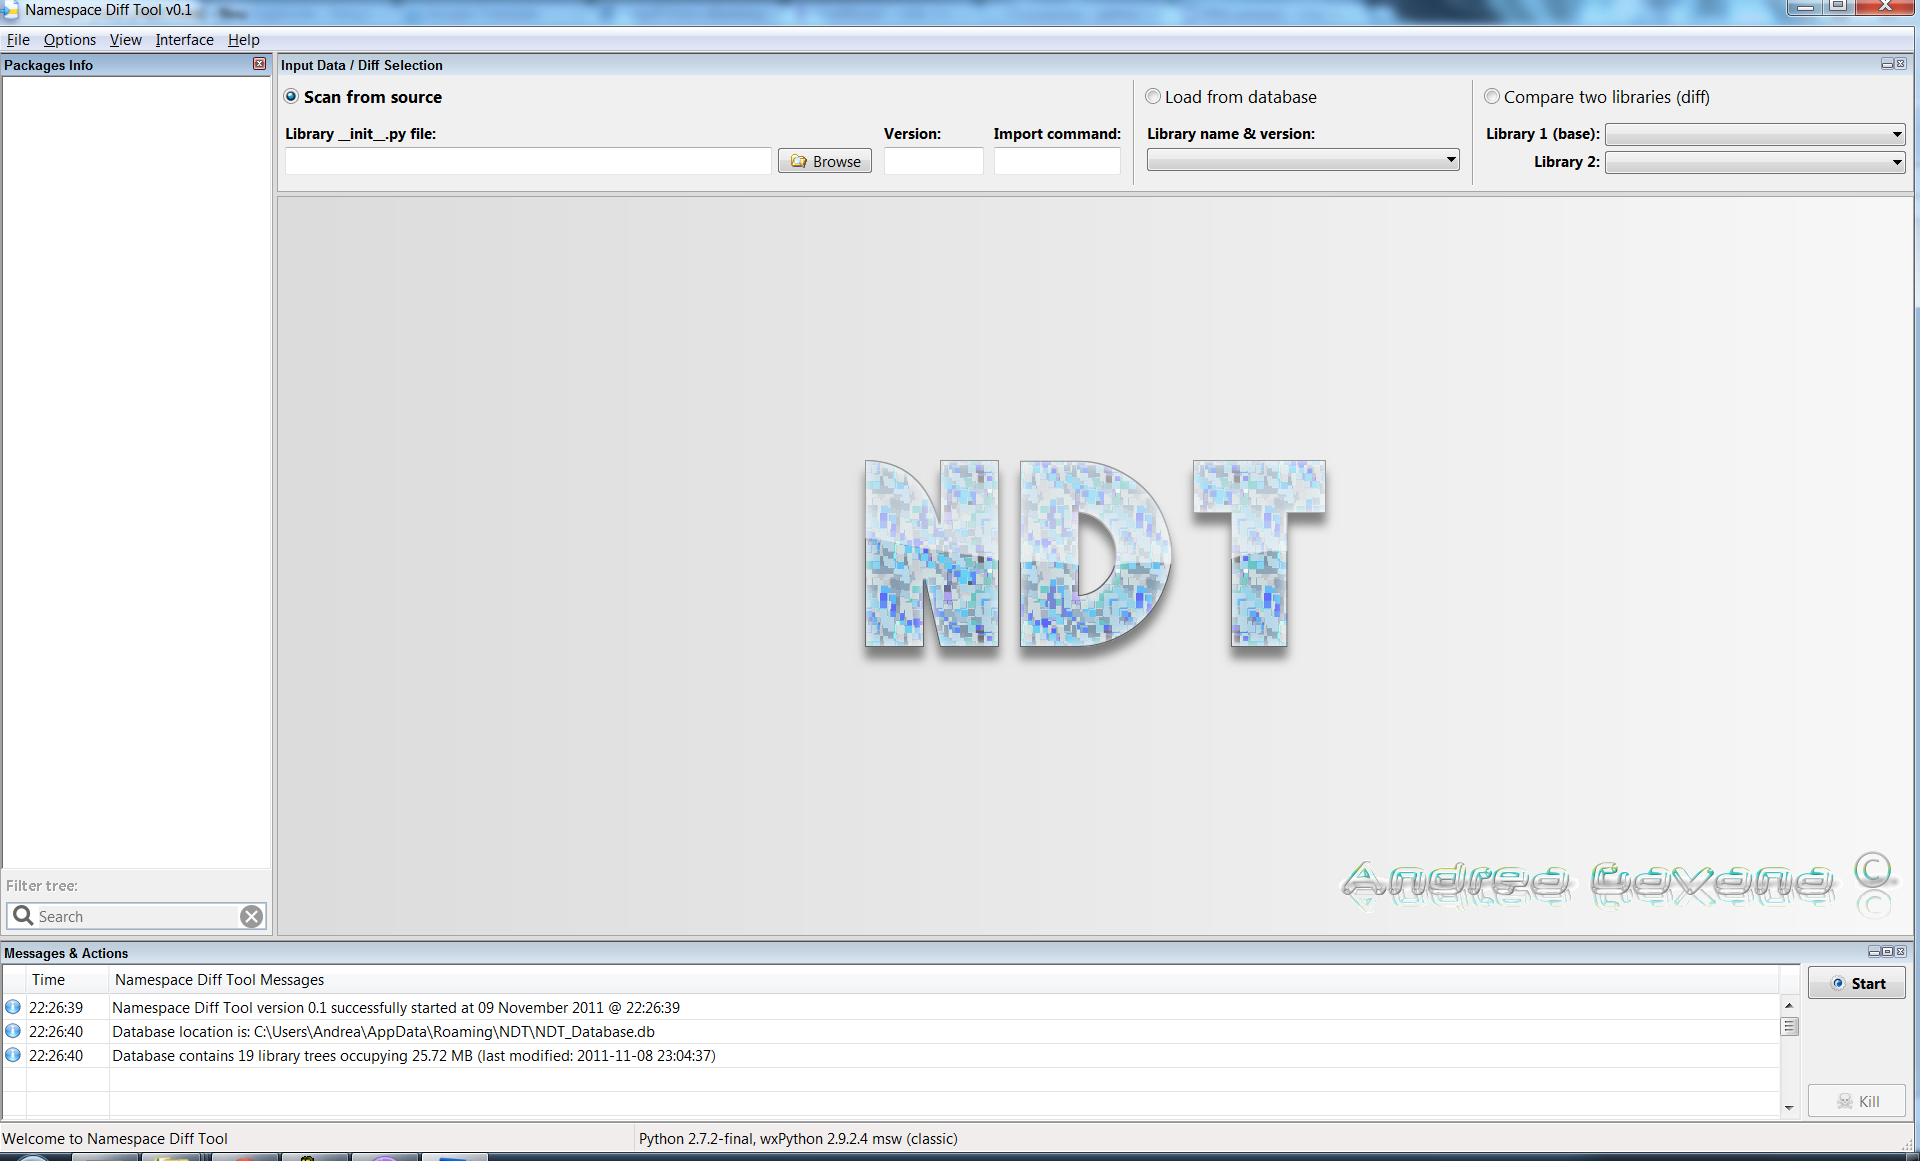
Namespace
Diff Tool (NDT)
(09-Nov-2011)
Warning: The source code for this project has been moved to Google Code here:
http://code.google.com/p/namespace-diff-tool/
Please use the above link to get the most up-to-date version of NDT.
The Namespace
Diff Tool (NDT) is
a graphical user interface
that can be used to discover differences between different versions of
a library, or even between different iterations/sub-versions of the
same library.
The tool can be used to identify
what is missing and still needs to be
implemented, or what is new in a new release, which items do not have
docstrings and so on. More detailed explanation is given in the
sections below.
Full description of the original idea by Robin Dunn:
http://svn.wxwidgets.org/viewvc/wx/wxPython/Phoenix/trunk/TODO.txt?view=markup
Warning: As most of the widgets in the GUI are owner drawn or custom, it is highly probable that the interface itself will look messy on other platforms (Mac, I am talking to you). Please do try and create a patch to fix any possible issue in this sense.
Requirements
In order to run NDT, these
packages need to be installed:
- Python 2.X (where 5 <= X <= 7);
- wxPython >= 2.8.10;
- SQLAlchemy >= 0.6.4.
NDT Capabilities
NDT is essentially able to
execute 3 different main actions depending on the user choice. The
panel at the top of the GUI offers the choices described below.
Scan
By clicking the "Browse" button
in the top panel and
selecting a Python
__init__.py file (which
represents the __init__.py
file for a library/package) and clicking on the "Start" button on the bottom right of
the GUI (or hitting the "F5"
key) will start the scan process for the selected library or package.
This action is executed in a separate Python process in order to not
interfere with the main GUI and to not pollute the GUI namespace. The
scan process can be run with a different Python version than the one
used to run the GUI: you can choose your default Python version from
the "Options" menu.
During the scan phase, the tool does live-objects introspection coupled
with raw Python files source code analysis. The tool records the
following information depending on the object type:
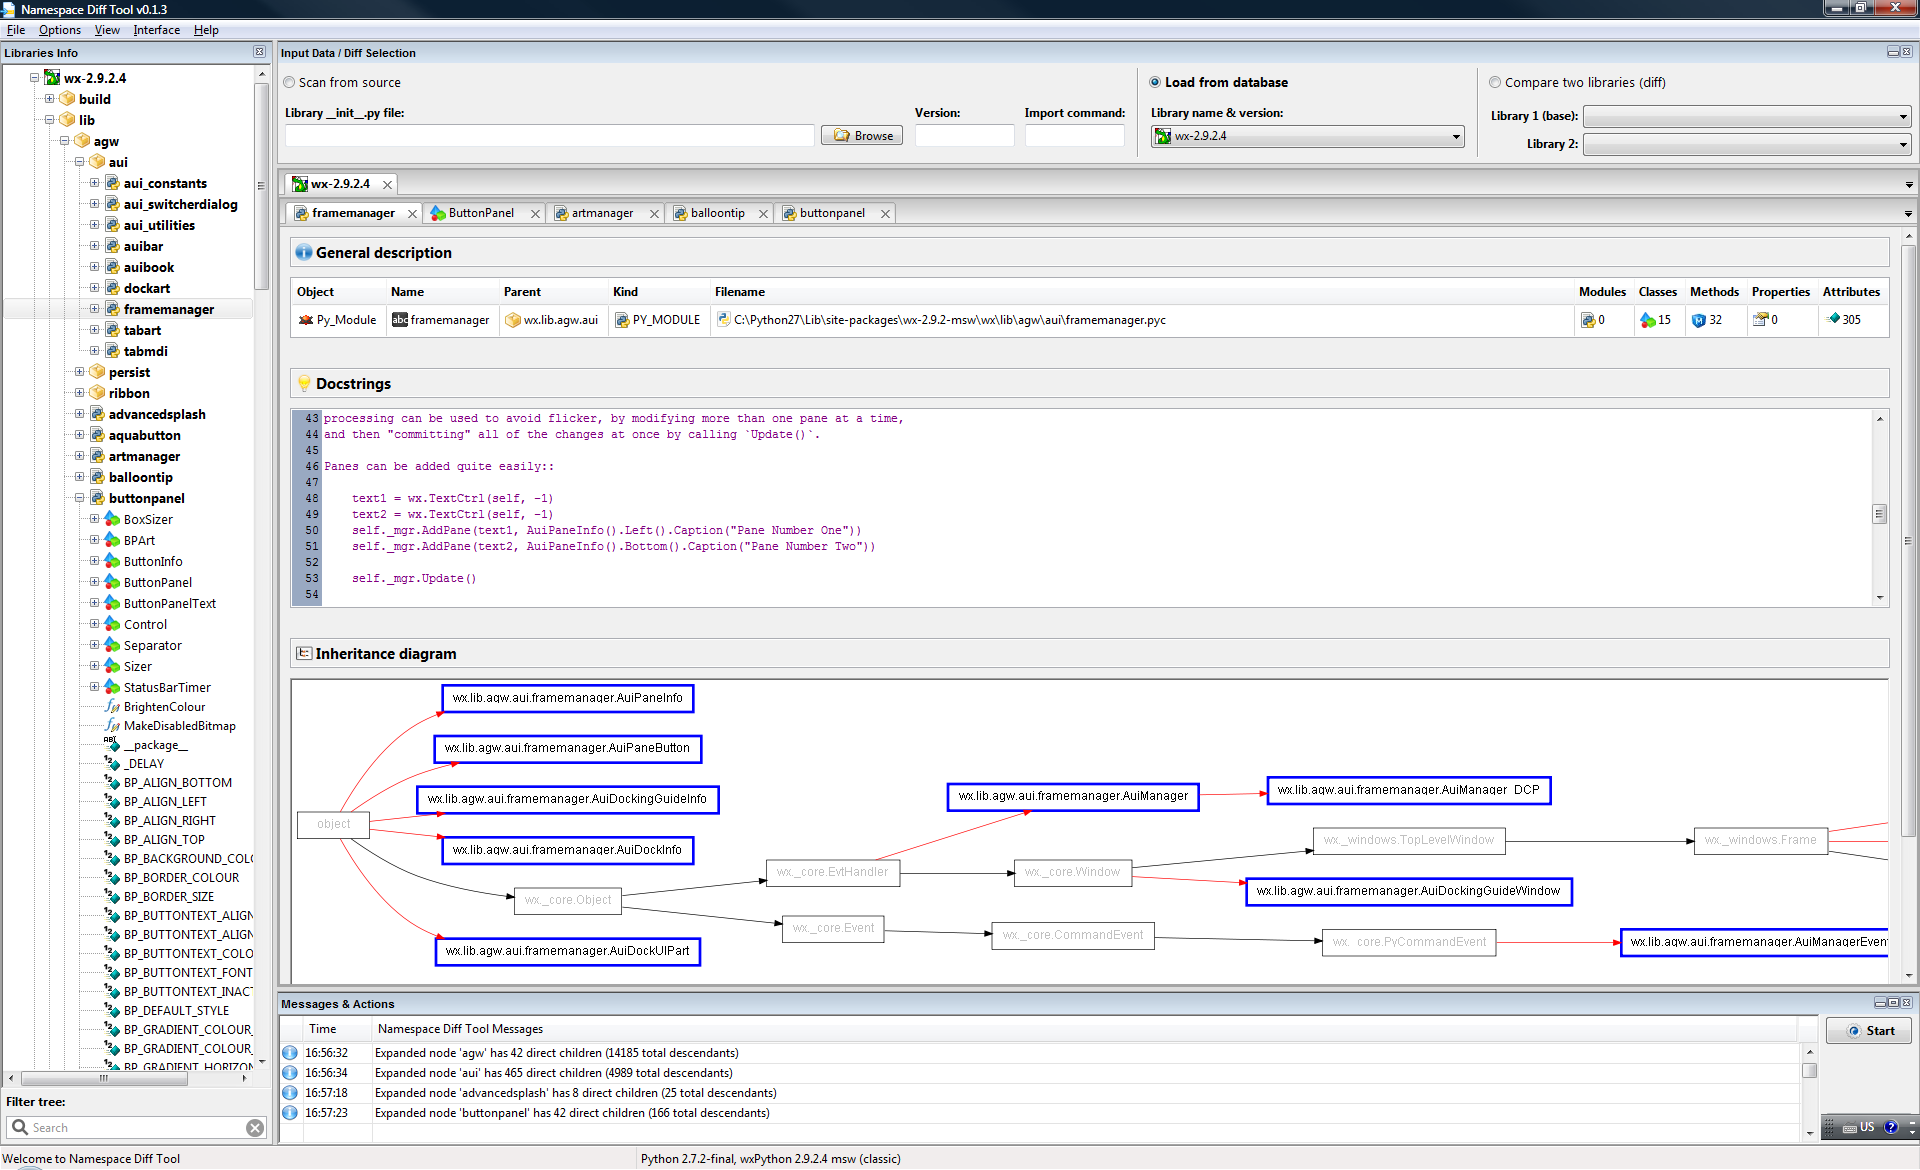
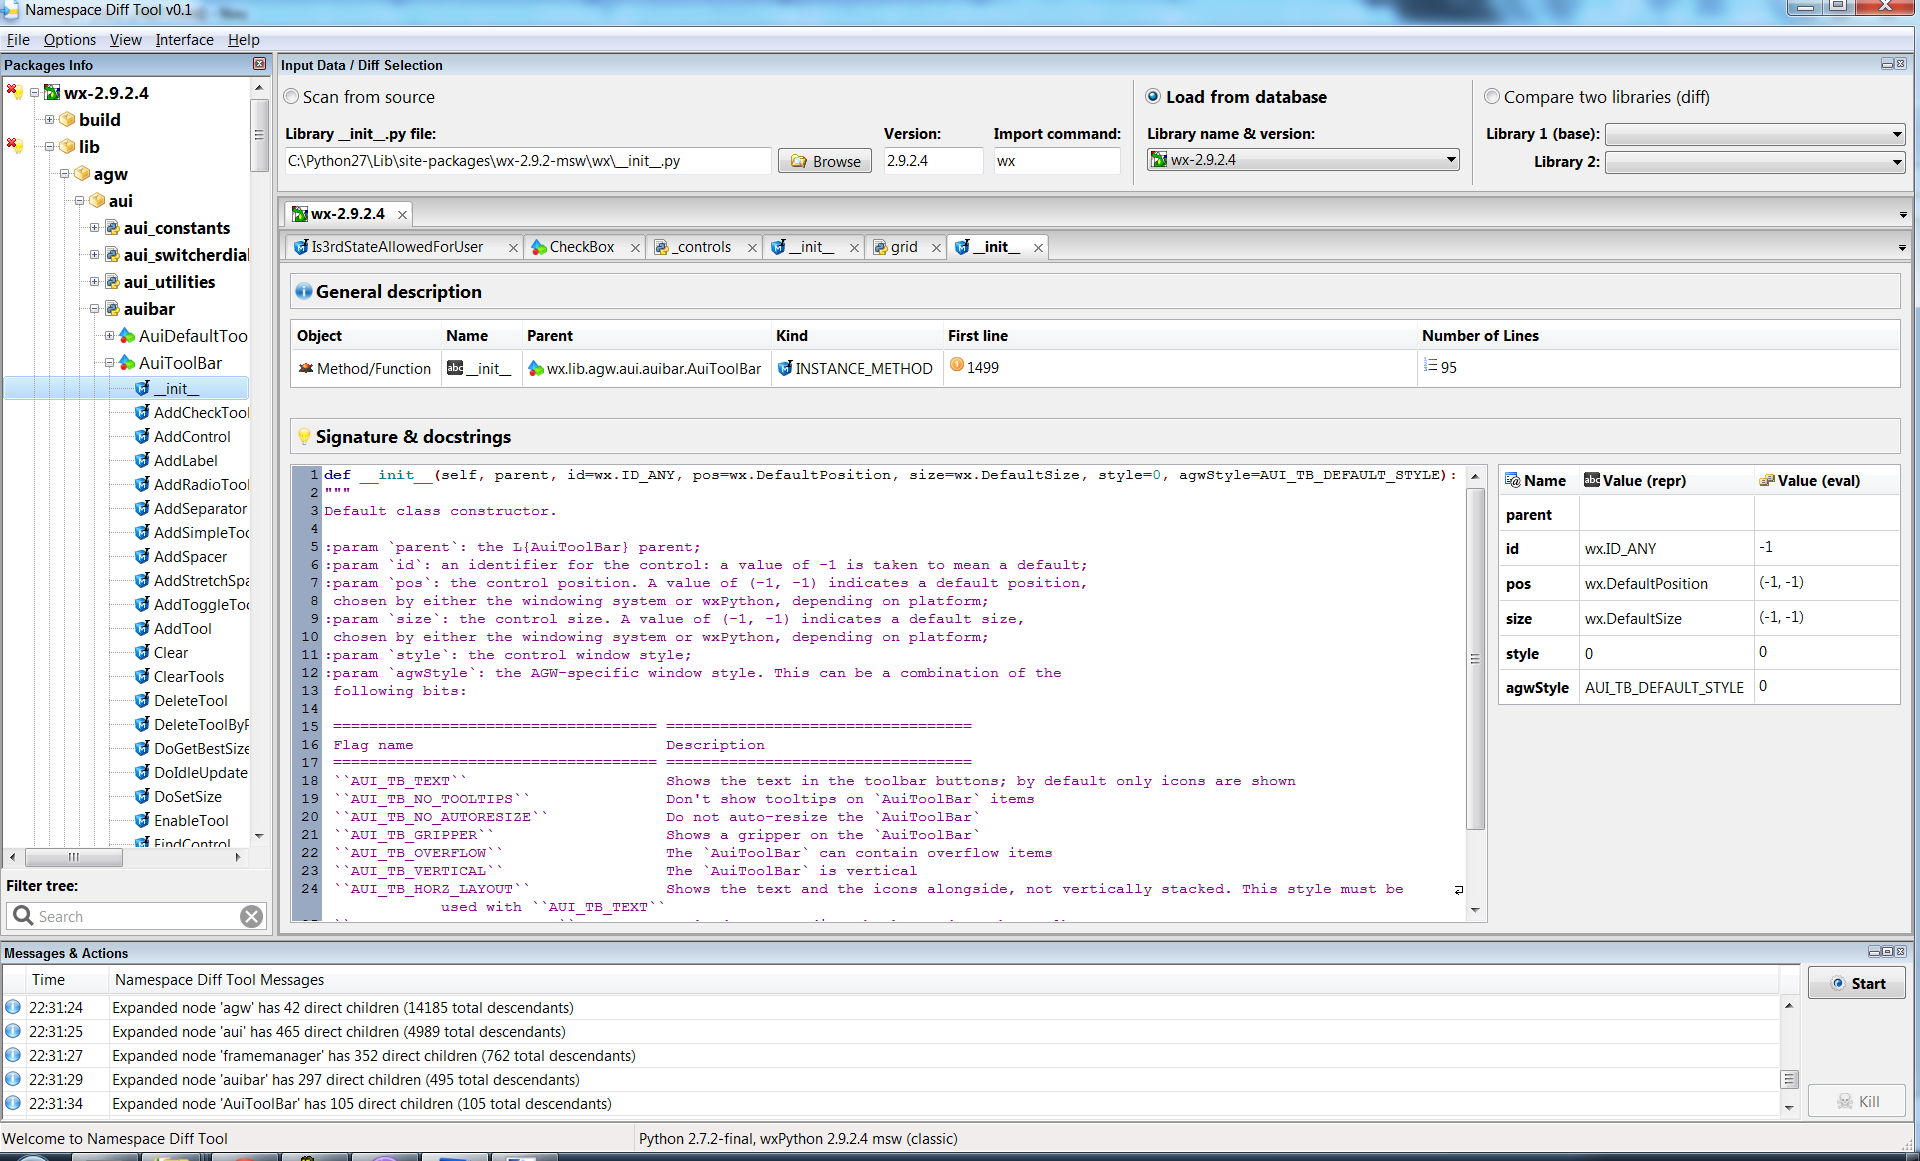
- Packages/Modules: module name, filename, docstrings and number of submodules, classes, methods/functions, properties and attributes (i.e., top-level "constants" in a module) and inheritance diagrams for all the classes contained in the module (for all modules where the number of classes is less than 20);
- Classes: class name, LOC, subclasses, superclasses, class tree, docstrings, class signature and number of methods/functions, properties, attributes and inheritance diagrams;
- Methods/Functions: name, type (i.e., classmethod, instancemethod, staticmethod, builtin method, builtin function, method descriptor), first LOC where the method is implemented, LOC, parameters name and default values (if any), method signature and docstrings;
- Properties: property name, getter (fget), setter (fset), deleter (fdel) and docstrings;
- Attributes: attribute name, kind (i.e., BoolType, IntType, ListType and so on), its value and possibly docstrings.
Once
the scan is finished, the resulting recorded information is stored in a
database (using SQLAlchemy)
in the user's data directory; in my case,
on my workplace machine the database is located in:
C:\Users\AGA108\AppData\Roaming\NDT\NDT_Database.db
The user's preferences are stored in the same folder.
NDT also stores a list of
recent scanned files and a list of recent
actions (i.e., Scan, Load, Compare) under the "File" menu.
Note: Inheritance diagrams can be visualized in the NDT interface fro classes and modules as well (as long as the number of classes is less than 20 in any given module). However, this requires the GraphViz application:
http://www.graphviz.org/
To be installed and on visible on the path (i.e., the dot command must be executable by NDT).
Load
Once at least one scan
has been successfully performed, you can view
the results of this scan by loading a single instance from the NDT
database.
By selecting one item in the dropdown combobox labelled as "Library name & version" and
clicking on the "Start"
button on the bottom right of the GUI (or hitting the "F5" key), the records for that
library are retrieved from the database and initially shown as a tree
on the left side of the GUI.
The tree stores information about packages, modules, classes and so on
in a hierarchical way, so you can drill down the tree structure and
analyze the content of a certain item.
If you are looking for a specific method/class/etc..., you can filter
the tree by typing part of the object's name on the bottom left of the
GUI and hit the "Enter" key to
see all the items with a (partly) matching name. This tree search
is case
insensitive.
By selecting one of the items in the tree, a new page will be created
in the central part of the GUI showing different information about the
selected item (refer to the "Scan"
section above for more information about what gets displayed).
From the "Options" menu, If you
activate the option of showing "inherited" attributes (i.e., attributes
that live in a namespace but for which the implementation is or
actually
in another module: for example wx.TextCtrl lives
in the wx
namespace but its implementation is in wx._controls.TextCtrl),
then these "inherited" objects will be represented in the tree with a
slanted font and a light grey colour.
Note: For rendering speed considerations, it is not recommended to turn on the "Show inherited items" option menu.
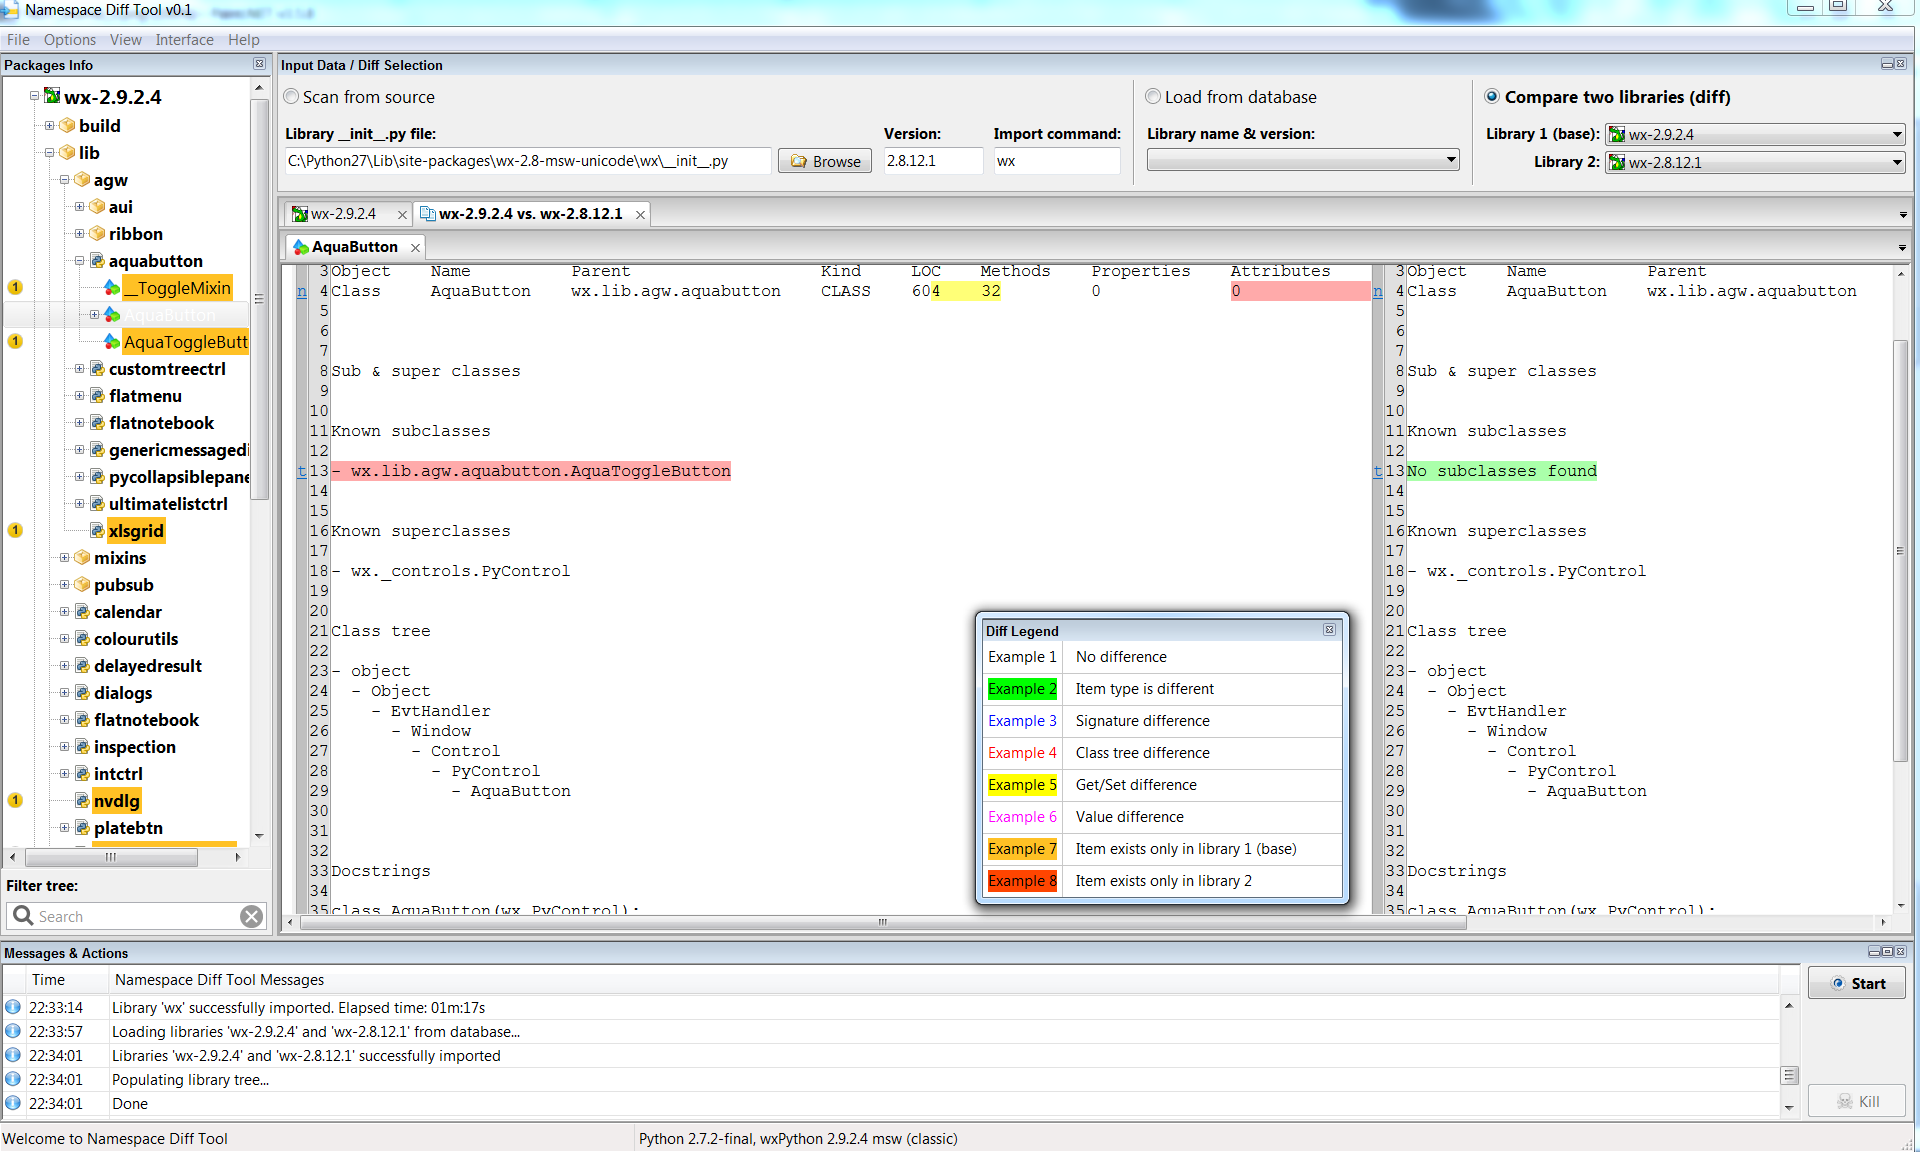
Compare
If you have previously
scanned two (or more) versions of the same
library (for example, wxPython 2.8.12 and 2.9.2.4), you can compare the
two versions by selecting the "Library
1 (base)" and "Library 2"
in the comboboxes at the top of the GUI. Then, by clicking on the "Start" button on the bottom right
of the GUI (or hitting the "F5"
key), the records for both libraries are retrieved from the database
and shown again in the tree on the left.
In this case, however, the tree items may have different
background/foreground colours depending on the most important
difference between the implementation of that object in library 1 and
library 2. A window representing a legend should automatically pop-up
to facilitate the interpretation of these colours, but this is the
colour-coding specification:
- No difference: default text colour (black on Windows) and no background colour;
- Item type difference: default text colour and green background colour;
- Signature difference: blue text colour, no background colour;
- Class tree/subclasses/superclasses difference: red text colour and no background colour;
- Get/Set difference (for properties): default text colour and yellow background colour;
- An object exists only in library 1: default text colour and orange background colour;
- An object
exists only in library
2: default text colour and reddish background colour.
Selecting
an item for which no differences were detected will open the same
window in the center of the GUI as described in the Scan section,
with information grabbed from library 1.
Selecting an item for which differences were detected will open a HTML
window in the center of the GUI showing a "diff" between the two
implementations.
At the moment this looks good only on Windows (using wx.lib.iewin_old) because wx.html can not handle the CSS code
generated by difflib, the
standard library used to compare two objects.
TODOs
- Smarter handling of the left tree control, the current approach is a bit fragile;
- The left tree control really needs to be heavily virtual, but none of the tree controls in wxPython offer this functionality. DataViewCtrl may be a possible candidate but that would mean abandon wxPython 2.8 (and learn how to use DataViewCtrl...);
- Allow to export the diff between two libraries into a XML file or similar;
- Find a way to let the user easily exclude/ignore items in the tree during diffs;
- Implement smarter tree filters, possibly showing functions only, classes only, attributes only and a combination of these flags;
- Implement the docstrings comparison (current the "Compare docstrings" menu does nothing);
- Allow the user to scan more than one library at a time (maybe using a custom wx.GenericDirCtrl with checkboxes to select which libraries to scan and then run the scans in parallel (or serially one after the other);
- Implement smart and nice tooltips for the left tree control;
- Add inheritance diagram pictures for module descriptions, maybe using GraphViz;
- Find an alternative to wx.html, as on other platforms the results of the "Compare" process will look a bit crappy;
- Provide an intelligent context menu for the tree control, for example to jump from an "inherited" attribute to the real one, or to examine the source code of an object;
- Extend the NDT documentation on the usage and capabilities;
- Add docstrings for all the methods in the GUI
implementation.
Supported Platforms
NDT has been tested on the
following
platforms:
- Windows
(Vista/7);
NDT
has been used to scan and analyze the following libraries:
apptools-4.0.0, Bio-1.57, cloud-2.2.4, coverage-3.5, Crypto-2.3,
Cython-0.14.1, dateutil-1.5, docutils-0.7, fwrap-1.0, html5lib-0.90,
IPython-0.11, jinja2-2.5.5, lxml-2.0, matplotlib-1.0.1, mayavi-4.0.0,
networkx-1.5, numpy-1.6.1, OpenSSL-0.12, paramiko-1.7.7.1,
PySide-1.0.5, pytz-2011g, reportlab-3788, scipy-0.9.0, setuptools-0.6,
sphinx-1.0.7, sqlalchemy-0.7.1, sympy-0.7.1, traits-4.0.0, vtk-5.0,
wx-2.8.10.1, wx-2.8.12.1, wx-2.9.2.4, xlrd-0.7.1, xlwt-0.7.1, zope-1.0
License And Version
NDT is distributed under the
wxPython license.
Latest revision: Andrea Gavana @ 14 Nov 2011, 21.00 GMT
Version 0.1.3
 |
 |
Download Namespace Diff Tool Python Files |
 |
 |