Home | Helps | materials palette
By jamesvalue
Materials palette
 The
materials palette
The
materials palette
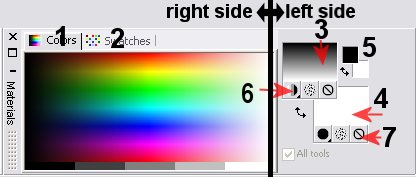
Materials palette's right side (these tabs don't change its functions whether
in vector or raster mode)
1 - 2 - color and swatches definition tabs
Material palette left side (this side change its functions from vector to raster
modes)
3 - foreground/stroke box (foreground=raster
, stroke=vector)
4 - background/fill box (background=raster
, fill=vector)
5 - foreground background color boxes
6 - buttons for item3- 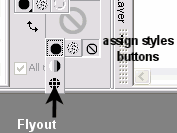 here
you can assign a material among three to be used for item 3
here
you can assign a material among three to be used for item 3
The little black arrow , actually hides a flyout menu composed of three buttons
:
color  , gradient
  ,
pattern
,
pattern  .
.
Those three buttons let you choose which style to assign to the item 3.
You can even texturize your styles by holding down the "texture"  button , or assign "no-style" for the item3 , by pressing the "none"
 button.
Note - this is a very useful feature the "none"
button infact while in "vector mode",
let you quickly choose a combination of outline/fill or no-outline , only fill
, or no-fill only outline and so-on , for the preset shape you're drawing.
7 - buttons for item4- Same as item6 , but
referred to item4 instead of item3.
Materials palette in raster mode
While in raster mode , since item3 is the "foreground" style and
item4 the "background" style of the material palette , we have to
define what is "foreground" and what is "background".
Foreground is normally something associated to the left mouse button (LMB) ,
and background to the right mouse button (RMB)
Note - this limitations are valid for the "material
palette" only .
 (just click on the little arrow and choose
"color")
(just click on the little arrow and choose
"color")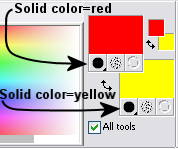 You
should have something like the image beside.
You
should have something like the image beside.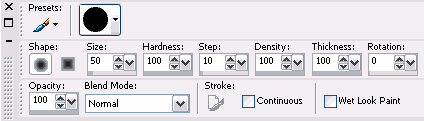 , gradient
and pattern .
, gradient
and pattern .Materials palette in vector mode
While in vector mode , since item3 is the "stroke" style and item4
the "fill" style of the material palette (vector mode) , we have to
define what is "stroke" and what is "fill" for the material
palette.
Stroke is an "outline" of a vector object, while fill is the "inside"
of the same vector object. (see example 2 for further
details)
Example2 - vector mode
Open a new drawing 200X200 px , 24bit , transparent
and vector background.
 From the
tool palette pick the preset shape tool , that's a vector tool.
From the
tool palette pick the preset shape tool , that's a vector tool.
Go to the "tool option" menù and ensure that the below settings
are applied
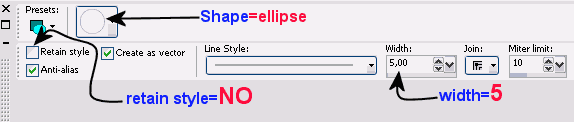
Then switch to the material palette.
Set the flyouts for item6 and7 to "color"
(just click on the little arrow and
choose "color")
Click on item3 and item4 to assign the colors , and then assign "red"
to item3 and yellow to item4.
You
should have something like the image beside.
Draw an ellipse on the canvas
 the outside of the shape is defined by the item3 (stroke box), while the inside
of the shape is defined by item4 (fill box).
the outside of the shape is defined by the item3 (stroke box), while the inside
of the shape is defined by item4 (fill box).
Home | Helps | materials palette
Web site dedicated to Paint shop pro8
|
 |
This site uses tons of "png" images. If you have trouble viewing them an upgrade to a newer browser version should correct those problems (by JimL)
|