Tutorial "Africa"
Borders of different dimensions,
but having an identical appearance, in the speed.
but having an identical appearance, in the speed.
For the French version of this tutorial, click the flag
The firt stationery as exemple, "Africa": ICI.
Other stationary, "Unicorns" : ICI.
The firt stationery as exemple, "Africa": ICI.
Other stationary, "Unicorns" : ICI.
To realize this tutoriel, you will need 6 elements, all to create in Paint Shop Pro:
-A vertical bar of 1x40 pixels of white colour or black colour (or of quite other colour of your choice, which gets loose from colours of the set).
-A horizontal bar of 40x1 pixels of the same colour as a first file.
-An image without demarcation having 400 pixels of width, that you will name image-big-left.
For the height leave the height that you will find it By modifying measures, by keeping so the proportions of the image.
-The same image without demarcation, but what you will have turned(returned) in PSP and what you will name image-big- right.
-The same image of departure without demarcation, but with 200 pixels of width (height will remain proportionned) that you will name image-little-left.
-The previous same image, but what you will have turned(returned) in PSP and what will name us image-little-right.
WITH SCRIPPY
1) Open your Scrippy software and make Insert /background and put a colour of your choice, according to the colours of the images which you will put.
I used the following colour: #232029.
2) Insert / Positioned Container (of this container will depend 3 successive compartments).
Horizontal Layaut: first column: From Left: 30; Specified size: 100.
Vertical Layaut: deuxièmre column: From Top: 0; From Bottom: 0.
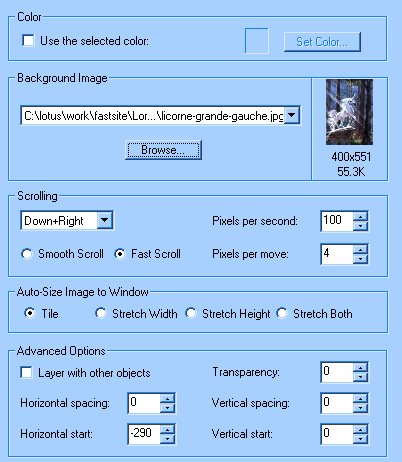
3) Insert / Background: put your image-big-left, and put the following setting:
4) Insert / Left Border Scroll: 1 x 40 pixels click Browse and go for the file jpg.
Scroll Direction: None.
5) Insert / Right Border Scroll: click Browse and put again the file of the previous compartment.
Scroll Direction: None.
6-9) Copy to stick one of the compartment 2 and place it completely to the left.
Change in the compartment 7:
-Insert image-big-right.
-In Scrolling put Down+Left.
-In Horizontal start, put: 0.
10) Insert / Positioned Container: place the compartment completely towards the left.
Complete the second column: put 130 with regard to every edge:
-From Left: 130.
-From Right: 130. -From Top: 130.
-From Bottom: 130.
Of this container are going to depend the following 16 compartments, as you can see in the following image:
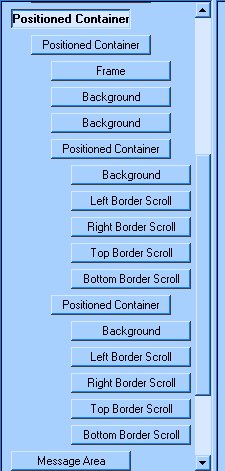
11) Insert / Positioned Container: it will remain dependent on the precedent:
And this time put 30 with regard to every edge:
-From Left: 30.
-From Right: 30.
-From Top: 30.
-From Bottom: 30.
12) Inser / Frame: style: solid; widht: 1; color: that of your choice. I put the with colour.
13) Insert / background (it is one of the 2 backgrounds that we shall see in transparency next size down the message): and put again image-big-right.
Scrolling: Down+Left; Pixels per the second: 10; Pixels per move: 1: Mark Smooth scroll.
In Advanced Options, mark Layer with others objects and in Transparency, put 80.
14) Copy and paste the previous compartment, but change 2 things:
-Put image-big-left.
-in Scrolling, put Down+Right.
15) Insert / Positioned Container (he will allow di built the left edge of the rectangle of the message).
Horizontal Layout: first column: From Left 0; Specified size: 50.
Vertical Layout: second column: From Top: 0; From Bottom: 0.
16) Insert / Background: to put image-little-left.
Attention in the configuration here, because it will allow to see to it that this bakcground of this border will have an evolution parallel to that of the background of the big border.
Scrolling: Down+Right; Pixels per move: 50; Pixels per move: 1; mark Fast scroll.
In Horizontal Start put - 145 (minus 145).
( As you see configuration is very different with regard to that of the compartment 3).
17) Insert / Left Border Scroll: put the file of 1 x 40 pixels. Scrolling: None.
18) Insert / Right Border Scroll: put again the file of 1 x 40 pixels.
Scrolling: None.
19) Insert / Top Border Scroll: put this time the file of 40 x 1 pixels.
Scrolling: None.
20) Insert / Bottom Border Scroll: put again the file of 40 x 1 pixels.
Scrolling: None.
21-25) Copy and paste the compartment 15 and place the compartment 21 indeed next size down of the compartment 15, as on the image put back above.
Make changes only in the compartment 22:
-Put image-little-right.
-In Scrolling, put Down+Left.
-In Horizontal Start, put 0.
26) Insert /MessageArea: place it completely to the left.
Put the following margins: Left: 220; Right: 220; Top: 170; Bottom: 170.
In this way we shall have the message inside the rectangle which will adapt itself according to the length the wrote text.
Mark Override default scrollbar colors and put colours of your choice for Base and Shadow. In this way the outside scrollbar will be colored.
27) Insert / options.
You will be able to complete little on the model which you see here:
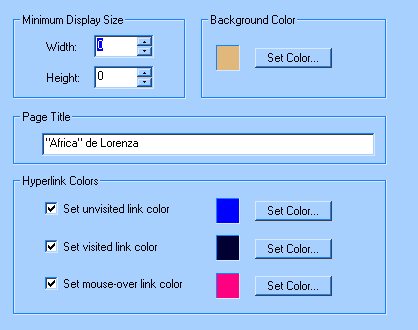
As you see, I selected as colour of background the colour which I used in the compartment 1 (and in the Loading message and in the scrollbar).
I indicated the title of the realization and I chose colours which will be able to serve for links:
-The first colour it is that of the link in the normal situation.
-The second it is for the link when we pass over the link with the mouse.
-The third colour it is that displays when we click the link.
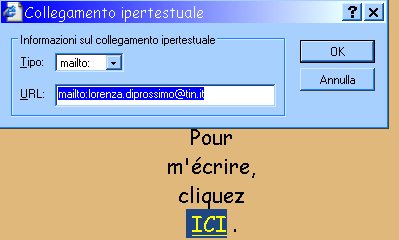
Make an attempt by putting a word - link in the Area message: put it in highlighting with the mouse; click then the icon to insert a link (at the top to the right), then select one of the choices in the pop-up menu.
For example, choose as me mailto, which allows to put an electronic active address:
If you prefer, you can put a web site by choosing http.
Add Sound, Ticker and Loading Message.
Save realization as file SSC or as file HTML.
******************
This tutorial was created on November 06, 2003 in the context of the works of the franco-scrippy group, founded by Mario Panone.
If you want following information about this group click the logo:
If you want to join this group, click HERE.
Good amusementl!
Lorenza
p. s: If you want to write to me to have supplementary information or to suggest advices, click HERE .

|

|