For the French version of the tutorial, click the flag:
If you want to show the stationary model, " Les Licornes 2 ", click
HERE.
To see the stationery "Femme" who presents some variation, click HERE.
*****************
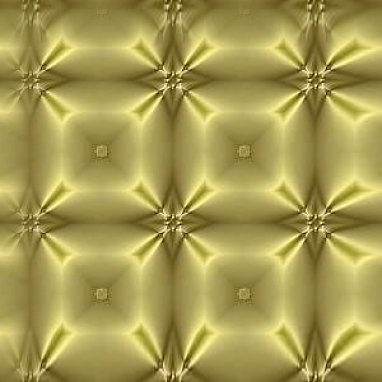
To realize this tutorial, you will need your Scrippy software, a golden bad luck of your choice. Here is the one that I chose:
and 2 images of your choice inverted the one with regard to the other one (or of 2 animated gifs, with inverted movement). Those that I chose were made smaller and crossed in the FM TILE TOOLS in the Paint Shop Pro software. Here they are:
1) Insert / Positioned Container and put the following values:
-Horizontal: Set Left and Right Edges ( second column): From Left: 0; From Right: O (so we have relative measures which adapt themselves automatically to all the screens of computer).
Vertical: Set Position and Height ( first column): From Center: 0; Specified Size: 820. Measure 820 for the height is obtained on the basis of the sum all the vertical elements (squared and naturally according to the height of the Message area).
2) Insert / Background. You select the golden bad luck. Scrolling: Down+Left; Pixels per the second: 10; Pixels per move: 1; Mark Smooth Scroll and leave the other unchanged options.
3) Insert / Positioned Container (in retreat with regard to the precedent) and in the right column, put From Left: 2; From Right: 2; From Top: 2; From Bottom: 2.
4) Insert / Background and put the black colour.
5) Insert / Positioned Container (to put at the same time as the compartment 3) : Column 1: From Left: 10; Size: 100; From Top 10; Size: 100.
Well find the position of this compartment of the first container of the square, because it is going to serve of point of departure for the other squares.
6) Insert / Background and put back the gilded bad luck, with the same values as to the point 2.
7) Insert / Positioned Container (in retreat with regard to the precedent) and in the right column, put From Left: 2; From Right: 2; From Top: 2; From Bottom: 2.
8) Insert / Background. You select the left image. Scrolling: Right; Pixels per the second: 10; Pixels per move: 1; Mark Smooth Scroll and Vertical start: 130 (it allows me to put my image of unicorns well in the centre of the square ............ this value will depend on the size of your image).
9 - 12) Click the compartment 5 and make Edit / Positioned Container. Then click the last compartment of the list and click the button Paste (either Ctrl + V) and you will see the rehearsal of the set(group) of compartments 5-8) at the bottom(really). It will then be necessary to place the compartment 9, well in parallel the compartment 5. In the compartment 9, put From Left: 60 and From Top: 60.
13 - 16) Made as for compartments 9-12, but this time, put in the compartment 13 From Left: 110 and From Top: 110.
17 - 20) Made as for compartments 9-12, but this time, put in the compartment 17 From Right: 10 and From Top: 10.
In the compartment 20, put Scrolling: Left and 260 in Horizontal start (the value which you put here will also depend on dimensions of your image: it will be necessary to make attempts to see to it that right images leave exactly at the same moment as left images: if one leaves value 0, they do not correspond).
21 - 24) Made as for compartments 9-12, but this time, put in the compartment 17 From Right: 60 and From Top: 60. And always 260 in Horizontal start of the compartment 24 and put Scrolling: Left.
25 - 28) Made as for compartments 9-12, but this time, put in the compartment 25 From Right: 110 and From Top: 110. And always 260 in Horizontal start of the compartment 28 and put Scrolling: Left.
29 - 32) Made as for compartments 9-12, but this time, put in the compartment 29 From Left: 10 and From Bottom: 10.
33 - 36) Made as for compartments 9-12, but this time, put in the compartment 33 From Left: 60 and From Bottom: 60.
37 - 40) Made as for compartments 9-12, but this time, put in the compartment 37 From Left: 110 and From Bottom: 110.
41 - 44) Made as for compartments 9-12, but this time, put in the compartment 41 From Right: 10 and From Bottom: 10. In the compartment 44: Scrolling: Left and Vertical start: 260.
45 - 48) Made as for compartments 9-12, but this time, put in the compartment 45 From Right: 60 and From Bottom: 60. In the compartment 48: Scrolling: Left and Vertical start: 260.
49 - 52) Made as for compartments 9-12, but this time, put in the compartment 495 From Right: 110 and From Bottom: 110. In the compartment 52: Scrolling: Left and Vertical start: 260.
53) Insert / Positioned container (to place very to the left, in parallel in the positioned of the compartment 1): second column: Set Left and Right Edges: From Left: 156; From Right: 156; Set Pip and Bottom Edges: From Top: 156; From Bottom: 156.
54) Insert Insert/ Background: put the gilded(bronzed) bad luck, as in the point 2.
55) Insert / Positioned Container (in retreat with regard to the precedent) and in the right column, put From Left: 2; From Right: 2; From Top: 2; From Bottom: 2.
56) Insert / Background: put the black colour.
57) Insert / Positioned Container (in retreat with regard to the precedent) and in the right column, put From Left: 5; From Right: 5; From Top: 5; From Bottom: 5.
58) Insert Insert/ Background: put the gilded bad luck, as in the point 2.
59) Insert / Positioned Container (in retreat with regard to the precedent) and in the right column, put From Left: 2; From Right: 2; From Top: 2; From Bottom: 2.
60) Insert / Background: put the black colour.
61) Insert / Message Area (always in retreat) and put as margins the following values: 10 on each side. Mark on Override Scrollbar color and in by clicking Set Base Color and on Set Shadow Color the colours which adapt themselves best to the colours of your composition.
Finally add music ( sound ), a ticker and possibly Loading Message.
Your realization is ready to be protected.
*****************
This tutoriel was created on January 12, 2003 in the context of the works of the French group - Scrippy, based by Mario Panone.
If you want following information about this group click the logo: