|
||||||
|
Clicca sulle immagini per ingrandirle Click on images for a larger version
|
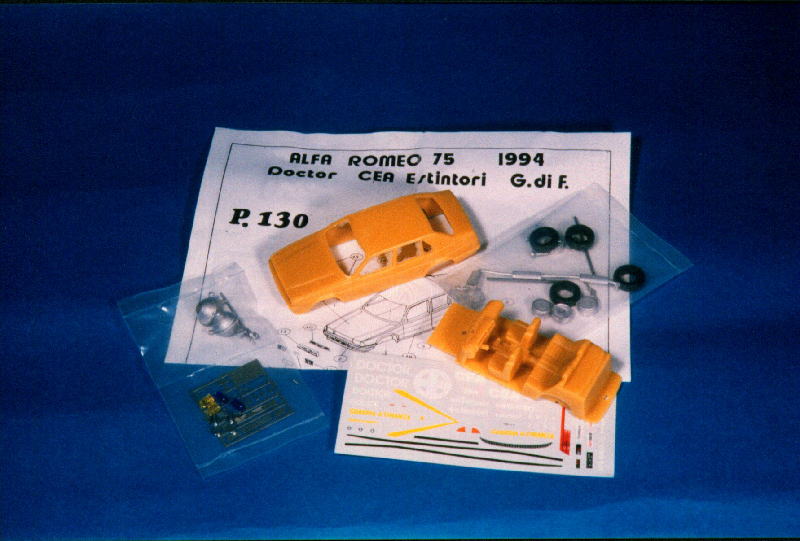
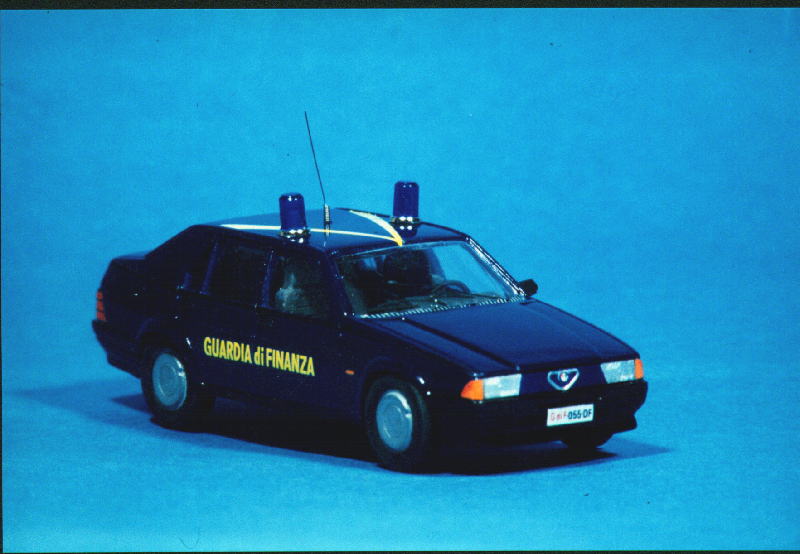
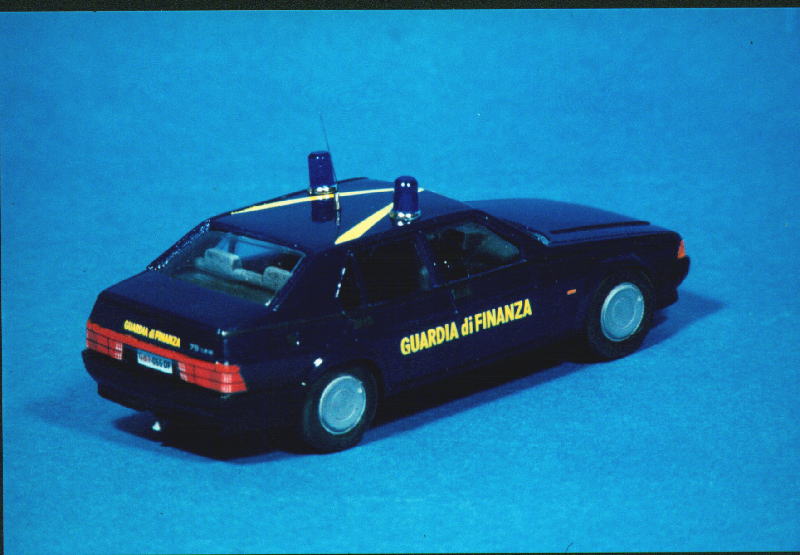
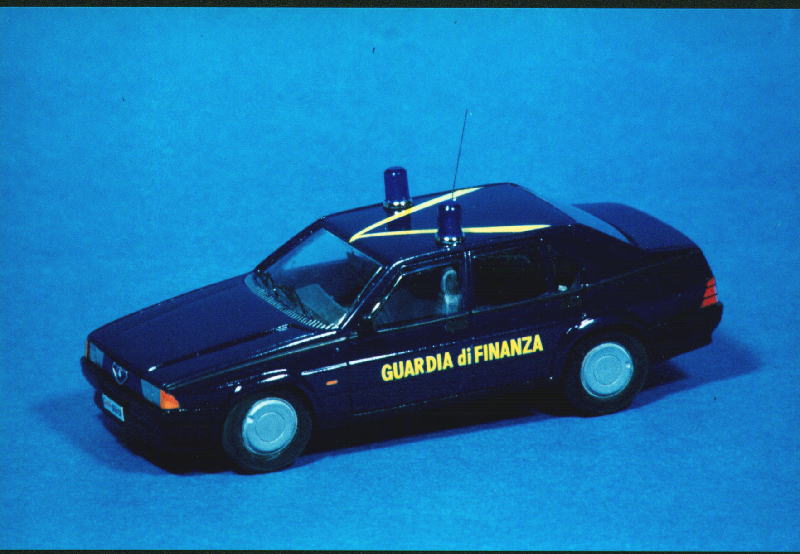
Il modello è prodotto dalla ditta TRON in scala 1/43 ed è in resina, con particolari fotoincisi ed in metallo. La particolarità di questo kit, è che permette di scegliere tra tre versioni: - CEA estintori (mondiale formula 1) - DOCTOR (mondiale formula 1) - Guardia di Finanza (oggetto della mia costruzione). La qualità della resina è ottima, solo qualche piccola sbavatura si trova nella zona dove andranno montati i vetri. Le fotoincisioni sono molto accurate e riproducono i fari , la mascherina anteriore, il tappo del serbatoio, le quattro maniglie ed il famoso freno a mano a forma di cloche. Si comincia pulendo la resina dalle poche sbavature sopracitate, utilizzando prima un cutter, dalla parte opposta della lama, e poi della carta abrasiva ad acqua della misura 1000 o maggiore. Questa carta rende la superficie perfettamente liscia e lucida, pronta per la fase di verniciatura. Una volta preparata la carrozzeria, si passa alla fase di decorazione di tutte le varie parti che compongono il kit. Infatti, fino a che la carrozzeria non è decorata non è possibile montare le altre parti, pena una grave difficoltà nel colorarle già montate. Ho passato un paio di mani di colore bianco opaco della Testor come base di primer, verificando la bontà della pulizia effettuata. Ho poi preparato l'aerografo, indispensabile per ottenere una finitura realistica, con il colore blu della Guardia di Finanza. Per la scelta di quest'ultimo, ho effettuato varie prove con colori di vari produttori; alla fine ho scelto il Blue primario della Gunze Sangyo, che mi è sembrato quello più vicino alla realtà. Ho quindi passato sul modello tre mani finissime del colore prescelto che ho poi lasciato asciugare per un paio di giorni. Dopo aver verificato la perfetta asciugatura, ho passato un paio di mani di vernice trasparente lucida e alla sua perfetta asciugatura ho mascherato, con della carta trasparente adesiva da disegnatori (quella a basso potere aderente) tutte le parti in blu per permettere la colorazione dei dettagli in nero opaco. Tali dettagli sono i paraurti anteriore e posteriore , la parte bassa delle fiancate e i fascioni laterali e posteriore di finitura. Il colore utilizzato è il nero opaco della Testor. Dopo aver atteso i canonici due giorni, ho montato tutti i particolari precedentemente decorati a parte e precisamente: le maniglie delle portiere, il tappo del carburante, le griglie anteriori con i fari e la targa anteriore. Per quanto riguarda la griglia anteriore, che è composta da più pezzi fotoincisi ho proceduto come segue. Prima si colora la parte posteriore, che va montata direttamente sulla resina del modello, in alluminio opaco, poi si passa alla decorazione della esterna che va effettuata dello stesso colore della carrozzeria. Nello stesso pezzo vi sono i fari anteriori, quindi, una volta asciugata la decorazione in blu, pitturiamo a pennello i fari con del colore argento. A questo punto bisogna montare la calandra anteriore dove poi verrà apposto il logo della casa Milanese. Tale calandra è cromata e nel kit è riprodotta in fotoincisione ma opaca. Ho quindi deciso di utilizzare il Bare Metal Fol. Tale prodotto consiste in un foglio di alluminio adesivo finissimo che, una volta tagliato leggermente più grande della parte che deve coprire, si adagia sulla stessa e poi si stende delicatamente. Le sue caratteristiche di finezza e di robustezza permettono di farlo aderire perfettamente ad ogni superficie, anche le più' 'tormentate'. In quelle più difficile è meglio procedere a pezzi, in quanto anche la sovrapposizione di un paio di strati non si vede. Per la parte posteriore è più semplice in quanto tutti fari, le frecce e i dettagli sono riprodotti con un'unica decal. Terminata questa fase, si incolla la calandra sulla griglia anteriore in perfetta posizione centrale. L'effetto del Bare Metal Foil è decisamente stupefacente, anche nelle scale più piccole come questa. Si montano quindi le ruote che sono composte dal cerchio, tornito in alluminio, dalle fotoincisioni che rappresentano i copri ruote e dalle gomme in gomma morbida. Questa parte non necessita di decorazione in quanto già nelle tinte reali. Ho quindi montato le ruote sugli assali aiutandomi, per il loro montaggio corretto, con una squadra e cercando di montarle perfettamente perpendicolari. Attenzione, gli assali vanno tagliati su misura, in quanto nella scatola sono più lunghi del necessario (non fate l'errore del sottoscritto che ha montato le ruote e poi si è accorto che debordavano solamente di un paio di centimetri.....). Prima di montare le ruote ed il fondino dell'auto, bisogna ovviamente decorare gli interni. Ho utilizzato il nero per le parti del cruscotto e gli interni non in tessuto e il grigio per i sedili e la moquette. Dopo aver steso i colori base, ho effettuato un drybrush con lo stesso colore schiarito. L'effetto finale è molto bello e rende profondità ad una parte del modello che sarà poi poco visibile una volta montata. Ho decorato il volante in nero e anche il freno a mano. Una volta terminata questa parte la mia attenzione si è rivolta al trasparente per i finestrini. Essendo in pezzo solo e creato in vacuform, deve tagliare la parte eccedente. Ho definito la parte da tagliare con un pennarello nero e l'ho poi tagliata con le forbici. A questo punto mi sono accorto che con la parte trasparente montata non si riusciva ad inserire la parte degli interni. Dopo varie prove, ho deciso infine di tagliare su misura ogni singolo pezzo dei trasparenti. Quindi ho preparato il parabrezza anteriore e posteriore, mentre i finestrini laterali sono riuscito a montarli in un pezzo unico, il destro ed il sinistro. Ho incollato i trasparenti utilizzando una colla a contatto e poi ho inserito gli interni e li ho bloccati in sede montando il fondino che viene avvitato nella sua sede. A questo punto, indossati i guanti in PVC per evitare di lasciare impronte sulla verniciatura, ho cominciato a piazzare le decals relative all'arma della Guardia di Finanza. Causa inesperienza ho danneggiato un paio delle stesse, riuscendo però a ripararle con l'ausilio dei prodotti in commercio (decal set vari). Ho trovato molto difficoltoso il posizionamento delle decals riguardanti le frecce anteriori, in quanto essendo la curvatura abbastanza accentuata e le decals molto piccole, non aderivano contemporaneamente ai due lati e quindi si staccavano rimanendo penzoloni. Dopo vari tentativi e quando mi ero ormai deciso a decorarli a pennello con dell'arancione, finalmente sono riuscito a farle stare in sede. Terminata questa fase ho concluso il montaggio incollando i lampeggiatori azzurri (forniti già pronti nel kit) e l'antenna radio (anch'essa presente pronta nel kit).
|
The
model is produced from company TRON in scale 1/43 and is in resin, with
particular fotoincisi and in metal. The
particularitity of this kit, is that it allows to choose between three
versions: -
CEA extinguishers (world-wide
formula 1) -
DOCTOR (world-wide
formula 1) -
Financial police (object
of my construction). The quality of the resin is optimal, single some small slobber is found in the zone where they will go mounted the glasses. The photogravures are the many taken care of and riproducono beacons, the front template, the stopper of the tank, the four handles and the famous brake by hand to shape of cloche. It is begun cleaning up the resin from little sopracitate slobbers, using a cutter before, from the opposite part of the blade, and then of the abrasive paper to water of greater measure 1000 or. This paper renders the surface perfectly smooth and polishes, ready for the phase of paint job. Once prepared the auto body, passes to the phase of decoration of all the several parts that compose the kit. In fact, until that the auto body is not decorated is not possible to mount the others leaves, pain a serious difficulty in the colorarle already mounted. I have passed to a pair of color hands opaque white man of the Testor like base of primer, verifying the carried out goodness of the pulizia. I have then prepared the airbrush, indispensable in order to obtain one realistic finish, with the blue color of the Financial police. For the choice of this last one, I have carried out several tests with colors of several producers; to the end I have chosen the primary Blue of the Gunze Sangyo, than me it has seemed that more close to the truth. Therefore I have passed on the model the three most fine hands of the prechosen color that I have then left to dry for a pair of days. After to have verified the perfect drying, I have passed a pair of transparent varnish hands polishes and to its perfect drying I have masked, with of the adhesive transparent paper from designers (that one to low adherent power) all the parts in blue in order to allow the coloration of the details in black opaque. Such details are the front and posterior bumpers, the low of the flanks and the lateral fascioni and posterior part of finish. The used color is black the opaque one of the Testor. After to have waited for canonical the two days, I have mounted all the particular previously decorated to part and just: the handles of the porter, the front stopper of the fuel, griglie with the beacons and the front plate. As far as the front grill, that it is composed from more pieces fotoincisi I have proceeded as follows. Before the posterior part is colored, that it goes mounted directly on the resin of the model, in opaque aluminum, then is passed to the decoration of the external that goes carried out of the same color of the auto body. In the same piece there are the front beacons, therefore, once dried the decoration in blue, we paint to paint-brush the beacons with of the color silver. To this point it must mount calenders it front where then it will come I lie in wait for the logo of the From Milan house. Such it calenders is chromium plated and in the kit it is reproduced in opaque photogravure but. Therefore I have decided to use the Coffins Metal produced Such Fol. consists in a sheet of the most fine adhesive aluminum that, once cut leggermente larger of the part that must cover, it is lain down on the same one and then it is spread delicately. Its characteristics of fineness and robustness allow of farlo joining perfectly to every surface, also the più' ' tormentate'. In that more difficult it is better to proceed to pieces, in how much also the superimposition of a pair of layers is not looked at. For the posterior part he is simpler in how much all beacons, the arrows and the details are reproduced with an only one decal. Finished this phase, it is glue calenders it on the front grill in perfect central position. The effect of the Coffins Metal Foil is decidedly narcotic, also in the smaller scales like this. The wheels are mounted therefore that are composed from the circle, tornito in aluminum, from the photogravures that they represent you cover wheels and from rubbers in soft rubber. This part does not need already of decoration in how much in the real inks. Therefore I have mounted the wheels on the axles aiutandomi, for their corrected assembly, with one square and trying of montarle perfectly perpendicular. Attention, the axles go cut on measure, in how much in the box they are longer of necessary (not the fairies the error of the undersigned who has mounted the wheels and then it is shrewed that debordavano only of a pair of centimeters Before mounting the wheels and they found of the car, obviously must decorate the inner ones. I have used black for the parts of the instrument panel and the inner ones in not woven and the gray for the seats and the moquette. After to have spread the colors base, I have carried out a drybrush with the same schiarito color. The final effect is much beautiful one and renders depth to a part of the model that then little visible once will be mounted. I have decorated black flying in and also the brake by hand. Once finished this part my attention has addressed to the transparent one for the windows. Being in single and created piece in vacuform, it must cut the exceeding part. I have defined the part to cut with a pennarello black and I have then cut it with the scissors. To this point me they are shrewed that with the mounted transparent part it was not succeeded to insert the part of the inner ones. After several tests, I have decided finally to cut on every measure single piece of the transparent ones. Therefore I have prepared front and posterior the windshield, while the lateral windows are successful to montarli in an only piece, the right and the left. I have glue the transparent ones using a glue to contact and then I have inserted the inner ones and I have them blocked in center mounting found that he comes screwed in its center. To this point, worn the gloves in PVC in order to avoid to leave prints on the paint job, I have begun to place the decals relative to the arm of the Financial police. Cause inexperience I have damaged a pair of the same ones, succeeding but in ripararle with the aid of the products in commerce (decal several set). I have found the much difficult positioning of decals regarding the front arrows, in how much being the emphasized curving enough and decals the many small, did not join at the same time to two sides and therefore they were detached remaining penzoloni. After several attempts and when by now I had decided myself to decorarli to paint-brush with of the orange, finally they are successful to farle being in center. Finished this phase I have concluded the assembly glue the blue traffics indicator (supplied already ready in kit) and the antenna radio (ready present it in the kit). |
||||