|
||||||
|
Clicca sulle immagini per ingrandirle Click on images for a larger version
|
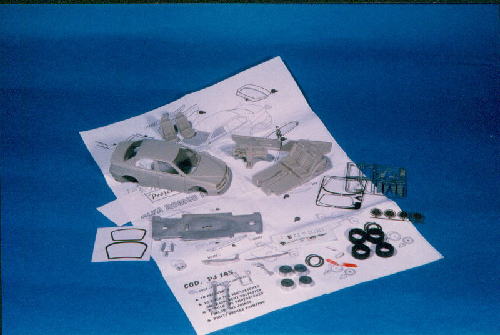
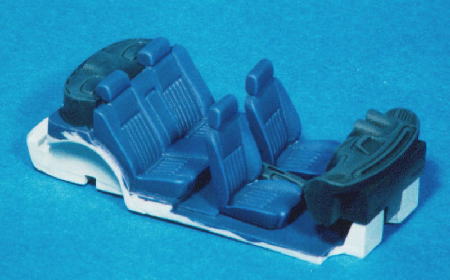
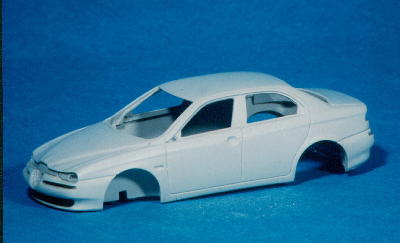
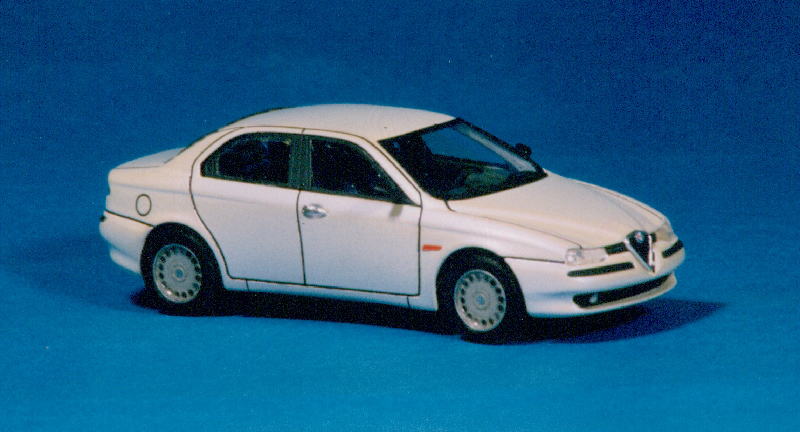
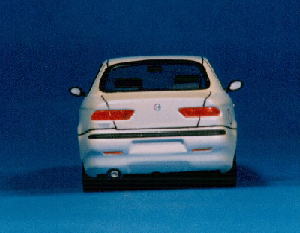
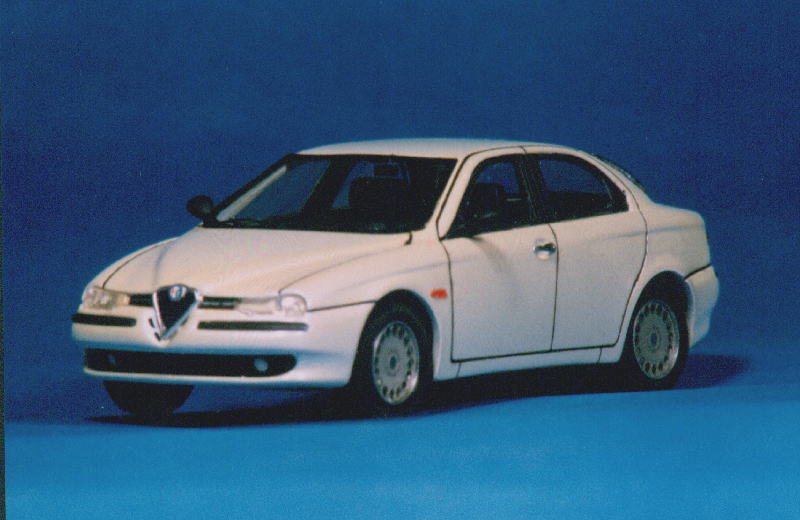
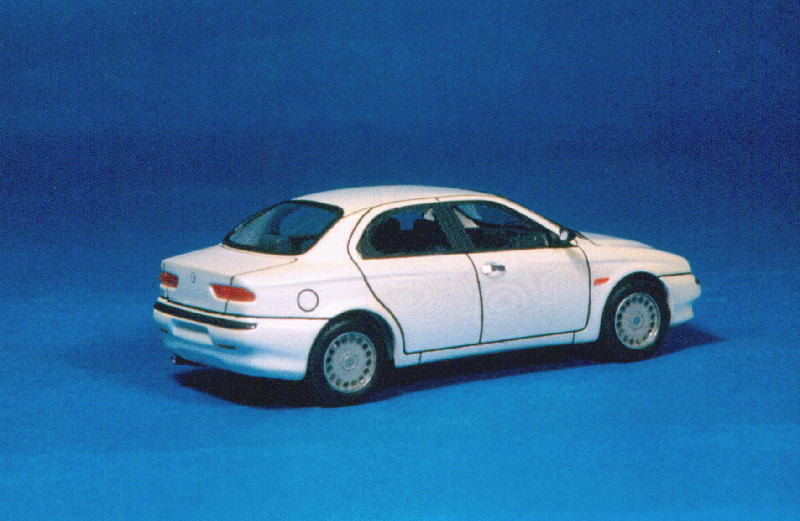
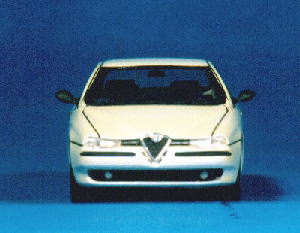
l kit della B.B.R. (codice PJ 145), contiene delle parti in resina (corpo carrozzeria e tutti gli interni), in fotoincisione (pedaliera, tergicristalli, maniglie porte, finiture interni, cornici vetri e copricerchioni) e in metallo bianco (paraurti anteriori e posteriori, specchietti esterni, calandra anteriore, assali ruote, leva del cambio, sistema di scarico, volante e fondino di chiusura), oltre alle ruote in alluminio tornito, le gomme in caucciù, i fari preconfezionati, un foglio di decals, le istruzioni ed un foglio di acetato trasparente per riprodurre i vetri. La qualità di tutti i pezzi è eccellente, soprattutto le fusioni in resina sono stupende e portano via poco lavoro di preparazione e pulizia. Dopo aver carteggiato e ripulito le poche imperfezioni presenti sulla resina e sul metallo bianco, ho suddiviso le parti, raggruppandole a seconda del colore necessario alla loro decorazione. Fondino, paraurti, cornici vetri, pedaliera, specchietto interno, calandra anteriore, tergicristalli, cruscotto, assali ruote e volante sono stati decorati in nero opaco (Testor) ad aerografo. Le parti riproducenti il tessuto degli interni, sono state decorate in Oxford Blue (Vallejo) e hanno ricevuto un 'corposo' drybrush in Flat Blue (Vallejo). Per quanto riguarda la carrozzeria, ho deciso di decorarla con uno dei colori più in voga per questo modello e cioè il Chamelon Blue-Blau della Createx. Tale ditta produce una serie di colori acrilici dedicati alla grafica molto interessante. In particolare, questo utilizzato è del tipo metallescente, proprio come quello realmente utilizzato dall'Alfa Romeo. Per la sua diluizione si può usare l'acqua, meglio se distillata, anche se il sottoscritto ha ottenuto i migliori risultati utilizzando il solvente della Tamiya (dopo aver effettuato diverse prove). Le gomme hanno ricevuto una abbondante carteggiata per togliere la linea di fusione e per donare loro un aspetto più realistico, mentre i copricerchioni non sono stati toccati, in quanto il loro aspetto era già corretto. Su tutte le parti era stata aerografata una base bianco opaco (Testor) per uniformare le diverse superfici. Stese un paio di mani del colore sulla carrozzeria, ho coperto il tutto con una mano leggera di trasparente lucido. A questo punto, assicuratomi che tutti i colori fossero perfettamente asciutti, ho cominciato la fase di montaggio. Indossati un paio di guanti da chirurgo onde evitare di lasciare antiestetetiche impronte sulla carrozzeria ultimata, ho cominciato a montare i paraurti anteriori e posteriori, le maniglie delle porte e la calandra anteriore. Queste due ultime sono state rifinite con del Bare Metal Foil per dare loro l'aspetto cromato che hanno nella realtà; il risultato è stupefacente! Ho montato tutti gli interni precedentemente decorati, cruscotto, sedili anteriori, fiancate interne, volante, pedaliera e leva del cambio. Ho incollato le cornici dei vari vetri al foglio di acetato trasparente e ho poi ritagliato l'eccesso con delle fobici affilate. Ho quindi incollato il tutto al corpo macchina, incontrando qualche difficoltà per il lunotto posteriore e quello anteriore. Questi hanno una doppia curvatura che, sommata alla poca superficie di incollaggio a disposizione, rendono l'operazione oltremodo impegnativa. A questo punto ho montato lo specchietto interno, sulla parte interna del tetto, e le ruote (cerchio, gomme e copricerchi). Ho quindi effettuato il montaggio finale, non prima di aver eseguito numerose prove a secco. Ho inserito l'interno della vettura nel corpo carrozzeria, fissato con del cianoacrilato le ruote nella loro sede e montato il fondino di chiusura. Terminata la fase di montaggio, sono passato a quella dedicata al posizionamento delle decals, senza incontrare la minima difficoltà. Nel foglio sono incluse un congruo numero di doppioni per permettere la sostituzione di eventuali decals danneggiate durante il loro posizionamento. Un kit, questo della B.B.R., di ottima fattura, ben congegnato, ben dettagliato ed altrettanto tecnicamente ben eseguito. Quasi tutte le parti si possono decorare agevolmente con l'aerografo, in quanto singolarmente riprodotte (vedi ad esempio i paraurti). Solo le parti riguardanti gli interni sono state decorate a pennello con la tecnica del drybrush.
|
l kit of the B.B.R. (code PJ 145), contains of the parts in resin (body auto body and all the inner ones), in photogravure (inner pedal-key, tergicristalli, handles doors, finishes, frames E glasses copricerchioni) and in metal white man (front bumpers and posterior, external small mirrors, calender front, attack wheels, lever of the change, arrange of drainage, flying and found of closing), beyond to the wheels in tornito aluminum, the premanifactured rubbers in caucciù, beacons, a sheet of decals, the instructions and a sheet of transparent acetate for riprodurre the glasses. The quality of all pieces is excellent, above all the fusions in resin are wonderful and carry via little preparation job and pulizia. After to have corresponded and cleaned up the little present imperfections on the resin and the metal white man, I have subdivided the parts, raggruppandole to second of the necessary color to their decoration. They found, bumper, frames glasses, pedal-key, inner small mirror, calenders front, tergicristalli, instrument panel, you attack wheels and flying they have been decorated in black opaque (Testor) to airbrush. The riproducenti parts the woven one of the inner ones, have been decorated in Oxford Blue (Vallejo) and have received ' corposo' drybrush in Flat Blue (Vallejo). As far as the auto body, I have decided of decorarla with one of the colors more in voga for this model and that is the Chamelon Blue-Blau of the Createx. Such company produces one series of acrylic colors dedicated to the diagram a lot interesting. In particular, this used is of the metallescente type, just like that one really used from the Romeo Alpha. For its dilution the water can be used, distilled best if, even if the undersigned has obtained the best ones turned out using the dissolvent of the Tamiya (after to have carried out various tests). The rubbers have received one abundant corresponded in order to remove the fusion line and in order to donate they a more realistic aspect, while the copricerchioni have not been touched, in how much their aspect already was corrected. On all the parts base had been aerografata one opaque white man (Testor) in order to conform various the superficial ones. Spread a pair of hands of the color on the auto body, I have covered all with a light hand of transparent I polish. To this point, assicuratomi that all the colors were perfectly dry, I have begun the phase of assembly. Worn a pair of gloves surgeon waves to avoid to leave antiestetetiche prints on the completed auto body, I have begun to mount the front bumpers and posterior, the handles of the doors and calender it front. These two last ones have been rifinite with of the Coffins Metal Foil for giving it chromium plated aspect to they whom they have in the truth; the result is narcotic! I have mounted all the inner ones previously decorated, front instrument panel, seats, inner flanks, flying, pedal-key and lever of the change. I have glue the frames of several the glasses to the transparent acetate sheet and have then ritagliato the excess with of the sharp fobici. Therefore I have glue the all to the body machine, meeting some difficulty for the posterior rear window and that front one. These have a double curving that, added to the little surface of incollaggio to disposition, renders the operation oltremodo impegnativa. To this point I have mounted the inner small mirror, on the inner part of the ceiling, and the wheels (circle, rubbers and copricerchi). Therefore I have carried out the final assembly, not before having executed numerous tests to dry. I have inserted the inside of the car in the body auto body, fixed with of cianoacrilato the wheels in their center and mounted they found of closing. Finished the phase of assembly, they are passed to that one dedicated to the positioning of the decals, without to meet the minimal difficulty. In the sheet they are included a consistent number of doppioni in order to allow the substitution of eventual decals damaged during their positioning. A kit, this of the B.B.R., of optimal invoice, very congegnato, very detailed and equally technically very executed. Nearly all the parts can be decorated easily with the airbrush, in how much singularly reproduced (see the bumpers as an example). Only the regarding parts the inner ones have been decorated to paint-brush with the technique of the drybrush.
|
||||