|
Dynamic Gray Tones Method: "DynaGray"
|
 |
|
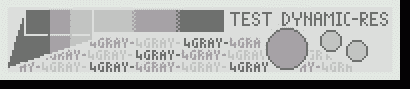
(Test image for "Dynamic Gray Tones" )
|
 |
Yes, it's true: you can have gray tones on the screen of your PB-1000!
|
|
...to be more precise:
every single pixel of the screen can be [White], [Ligth gray], [Dark Gray] or [Black], without any limitation.
So, your PB-1000 can show full screen images using 4 gray tones.
|
|
You may ask...
How can it be possible? ...some magic trick? ...complicated machine language programs? ...misterious registers of the LCD controller?
Nothing like that! ;)
I created this method in the far 1993, when I did know nothing about the LCD controller of PB-1000.
It's easy to do ...and simpler than you can believe.
|
We can start with a simple experiment using BASIC, just to help to "catch the idea":
|
|
- RAM expansion or floppy unit is not required here.
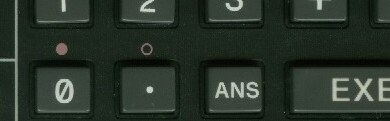
- Please, notice your PB has two special graphic characters: the "empty circle" and the "full circle":
- enter BASIC mode and write this first line:

This line prepares the screen, then waits for a key to procede... (all these characters are just for comparing)
- now, lets add the "gray tone engine" ; ) ... just insert lines 2 & 3:
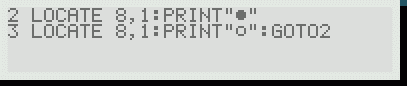
- now run the program ...and what's happen?
The first and the second print statements are fast overwritten one each other.
Where the pixels of both "circle" characters are present together, it will appair as [Black].
Where the "empty circle" if overwritten by the "full circle", it will appair as [Medium gray] because pixels are turned-on just 50% of the time.
The result:
Well, this was just a experiment...
BASIC is too slow and can't handle graphic screens.
|
|
Using machine language we can do much better...
|
|
- If we have 2 bitmap (called "bitplanes") fitted in memory, we can rapidly alternate them on the screen and the result is a "gray tones" image! This is why I called it "dynamic gray"...
Before to show how it works, I must explain some other details. Probably you already know them, but better help to remember:
the PB-1000 stores its graphic map starting from location &H6201.
The size of one screen is: 192x32 pixel/8 = 768 bytes. So the bitmap is located from &h6201 to &h6500.
But, you know, PB-1000 has a "8 text lines -virtual screen", so there is place for two graphic bitmaps.
-> We can store the second bitmap from &h6501 to &h6800.
As I told, a "dynamic gray" image is made by two bitplanes: "bitplane 0" and "bitplane 1".
We can prepare a file with the two "bitplanes", stored contiguosly. The file-size will be 768+768=1536 bytes.
Using statement: BLOAD"IMAGE",&H6201 we'll get both bitplanes ready in the place to be displayed!
Here is an example how both bitplanes are stored contiguously in a file:

In the "owner manual" there are two small examples to show how to "manipulate" the screen using machine language, do you remember?
The last statement is a call to DOTDI routine, used to display the final result of the program.
That is! Graphic map located at &h6201 is just a storage area, not really a direct video ram.
The LCD controller owns a dedicated RAM. So, you can write in the &h6201 area but you won't see any result until you transfer the data to the LCD, using the routine DOTDI.
Well, using DOTDI, we can display the fist bitplane ...now, how to display the second?
In the "Technical Reference" manual by Casio, you can read there is a location, in system area, used to specify a offset for DOTDI routine: location &h68C9, called "SCTOP" (SCreen TOP) .
This offset is specified as "character wide", it means the offset will be 6 times the value.
So, when offset is =0, DOTDI will copy bitmap from &h6201 as usual...
But if you set the offset =128, DOTDI will copy bitmap starting from adress &h6201+(6*128)=&h6501... and this is the position of the second bitplane we need!
Now, we are ready to program:
      1- make [offset=0] to point bitplane 0 and CAL DOTDI to display it

      2- wait a delay loop of T1 milliseconds

      3- make [offset=128] to point bitplane 1 and CAL DOTDI to display it

      4- wait a delay loop of T2 milliseconds

      5- check if keypressed -> exit

      6- repeat from point 1)
...the program's code is here: DynaGray.asm
You can see there are two delay loops. They are necessary because machine language is too fast.
We need only about 10 screen's refresh in a second, not hundreds!
The problem with PB1000's display is easy to understand: this "first generation" LCD has a poor contrast and the more you refresh, the more it will get weak...
Dynamic generated gray-tones request the best contrast possible on the screen: batteries must be ok, you must have a good source of light near your PB1000 and set contrast to max level...
IMPORTANT!! Instead of having delay loop T1 = T2, we can do better!
If we make delay T1 double than T2, bitplane 0 will be showed the 2/3 of the time and bitplane 1 only 1/3 of the time.
This will happen, for each pixel, if:
pixel is clear in both bitplanes, nothing will be show,we'll have [White]
if set only in bitplane 1, will last for 1/3 of time and we'll have [Ligth gray]
if set only in bitplane 0, will last for 2/3 of time and we'll have [Dark Gray]
if set in both bitplanes, will last 1/3+2/3= the entire time, we'll have [Black]
... and the result will be:

Look at the screen, with DynaGray there is always a bit of "flickering" effect...
|
 |
Here it is the archive for "DynaGray" demo, to download :
DynaGray
|
|
Instructions included. You need an interface to transfer it. (MD100 or FA7)
For better results, set the contrast to max and put a good light source behind your PB1000.
Ehy, man! Where do you go?
...there is much more to say about "DynaGray" method:
is it possible to use during a game? What tools can be used to create new images? Can this method display more than 4 gray tones?
I will come back, hope soon, to tell you more...
|
|
|
|
|
|