 Events and Event Handling
Like with all the other GUI frameworks, the control of flow in wxPython applications is event-based: the program normally performs most of its actions in response to the events generated by the user. These events can be triggered by using the input devices (such as keyboard, mouse, joystick) directly or, more commonly, by a standard control which synthesizes such input events into higher level events: for example, a Button can generate a click event when the user presses the left mouse button on it and then releases it without pressing Esc in the meanwhile. There are also events which don’t directly correspond to the user actions, such as TimerEvent.
But in all cases wxPython represents these events in a uniform way and allows you to handle them in the same way wherever they originate from. And while the events are normally generated by wxPython itself, you can also do this, which is especially useful when using custom events (see Custom Event Summary).
To be more precise, each event is described by:
There is one principal way to handle events in wxPython, which uses EvtHandler.Bind () call and can be used to bind and unbind the handlers dynamically, i.e. during run-time depending on some conditions. It also allows the direct binding of events to:
Let us start by looking at the syntax: in any place in your code, but usually in the code of the class defining the handler itself, call its Bind() method like this:
class MyFrame(wx.Frame):

    def __init__(self, parent):

        wx.Frame.__init__(self, parent)

        # Other initialization code...

        self.Bind(wx.EVT_MENU, self.OnExit, id=wx.ID_EXIT)
Event handlers can be bound at any moment. For example, it’s possible to do some initialization first and only bind the handlers if and when it succeeds. This can avoid the need to test that the object was properly initialized in the event handlers themselves. With Bind() they simply won’t be called if it wasn’t correctly initialized.
As a slight extension of the above, the handlers can also be unbound at any time with Unbind() (and maybe rebound later).
Almost last but very, very far from least is the flexibility which allows to bind an event to:
Let us now look at more examples of how to use different event handlers using the two overloads of Bind() function: first one for the object methods and the other one for arbitrary functors (callable objects, including simple functions).
In addition to using a method of the object generating the event itself, you can use a method from a completely different object as an event handler:
def OnFrameExit(event)

    # Do something useful.


class MyFrame(wx.Frame):

    def __init__(self, parent):

        wx.Frame.__init__(self, parent)

        # Other initialization code...

        self.Bind(wx.EVT_MENU, OnFrameExit, id=wx.ID_EXIT)
Note that MyFrameHandler doesn’t need to derive from EvtHandler.
The previous sections explain how to define event handlers but don’t address the question of how exactly wxPython finds the handler to call for the given event. This section describes the algorithm used in detail.
When an event is received from the windowing system, wxPython calls EvtHandler.ProcessEvent () on the first event handler object belonging to the window generating the event. The normal order of event table searching by ProcessEvent() is as follows, with the event processing stopping as soon as a handler is found (unless the handler calls Event.Skip () in which case it doesn’t count as having handled the event and the search continues):
Please pay close attention to step 6! People often overlook or get confused by this powerful feature of the wxPython event processing system. The details of event propagation up the window hierarchy are described in the next section.
As mentioned above, the events of the classes deriving from CommandEvent are propagated by default to the parent window if they are not processed in this window itself. But although by default only the command events are propagated like this, other events can be propagated as well because the event handling code uses Event.ShouldPropagate () to check whether an event should be propagated. It is also possible to propagate the event only a limited number of times and not until it is processed (or a top level parent window is reached).
Finally, there is another additional complication (which, in fact, simplifies life of wxPython programmers significantly): when propagating the command events up to the parent window, the event propagation stops when it reaches the parent dialog, if any. This means that you don’t risk getting unexpected events from the dialog controls (which might be left unprocessed by the dialog itself because it doesn’t care about them) when a modal dialog is popped up. The events do propagate beyond the frames, however. The rationale for this choice is that there are only a few frames in a typical application and their parent-child relation are well understood by the programmer while it may be difficult, if not impossible, to track down all the dialogs that may be popped up in a complex program (remember that some are created automatically by wxPython). If you need to specify a different behaviour for some reason, you can use Window.SetExtraStyle (WS_EX_BLOCK_EVENTS) explicitly to prevent the events from being propagated beyond the given window or unset this flag for the dialogs that have it on by default.
Typically events that deal with a window as a window (size, motion, paint, mouse, keyboard, etc.) are sent only to the window. Events that have a higher level of meaning or are generated by the window itself (button click, menu select, tree expand, etc.) are command events and are sent up to the parent to see if it is interested in the event. More precisely, as said above, all event classes not deriving from CommandEvent (see the Event inheritance diagram) do not propagate upward.
In some cases, it might be desired by the programmer to get a certain number of system events in a parent window, for example all key events sent to, but not used by, the native controls in a dialog. In this case, a special event handler will have to be written that will override ProcessEvent() in order to pass all events (or any selection of them) to the parent window.
The step 4 of the event propagation algorithm checks for the next handler in the event handler chain. This chain can be formed using EvtHandler.SetNextHandler ():
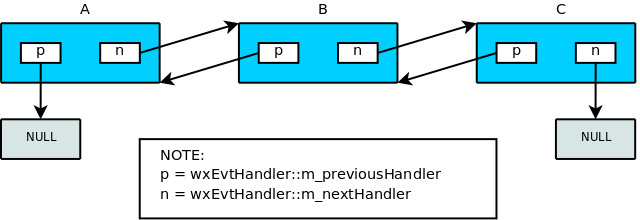
(referring to the image, if A.ProcessEvent is called and it doesn’t handle the event, B.ProcessEvent will be called and so on...).
Additionally, in the case of Window you can build a stack (implemented using EvtHandler double-linked list) using Window.PushEventHandler ():

(referring to the image, if W.ProcessEvent is called, it immediately calls A.ProcessEvent; if nor A nor B handle the event, then the Window itself is used – i.e. the dynamically bind event handlers and static event table entries of Window are looked as the last possibility, after all pushed event handlers were tested).
By default the chain is empty, i.e. there is no next handler.
Custom event classes allow you to create more polished-seeming controls by allowing the control’s user to process updates without needing to sub-class the control. However, to effectively use events, you normally need to create custom event classes.
This recipe gives you some boilerplate code for creating your own custom event classes:
import wx
import wx.lib.newevent

SomeNewEvent, EVT_SOME_NEW_EVENT = wx.lib.newevent.NewEvent()
SomeNewCommandEvent, EVT_SOME_NEW_COMMAND_EVENT = wx.lib.newevent.NewCommandEvent()
You can bind the events normally via either binding syntax:
self.Bind(EVT_SOME_NEW_EVENT, self.handler)
EVT_SOME_NEW_EVENT(self, self.handler)
You can also attach arbitrary data to the event during its creation, then post it to whatever window you choose:
# Create the event
evt = SomeNewEvent(attr1="hello", attr2=654)
# Post the event
wx.PostEvent(target, evt)
When handling events with such arbitrary data, you can fetch the data via attributes, named the same as the names passed in during the event instance creation. That is, given the two keyword arguments passed to SomeNewEvent above:
def handler(self, evt):
    # Given the above constructed event, the following is true
    evt.attr1 == "hello"
    evt.attr2 == 654
While generically a Event can be generated both by user actions (e.g., resize of a Window) and by calls to functions (e.g., Window.SetSize), wxPython controls normally send CommandEvent -derived events only for the user-generated events. The only exceptions to this rule are:
TextEntry.ChangeValue can be used instead of TextEntry.SetValue but the other functions, such as TextEntry.Replace or meth:TextCtrl.WriteText don’t have event-free equivalents.
Window identifiers are integers, and are used to uniquely determine window identity in the event system (though you can use it for other purposes). In fact, identifiers do not need to be unique across your entire application as long they are unique within the particular context you’re interested in, such as a frame and its children. You may use the ID_OK identifier, for example, on any number of dialogs as long as you don’t have several within the same dialog.
If you pass ID_ANY or -1 to a window constructor, an identifier will be generated for you automatically by wxPython. This is useful when you don’t care about the exact identifier either because you’re not going to process the events from the control being created or because you process the events from all controls in one place (in which case you should specify ID_ANY in the EvtHandler.Bind call as well). The automatically generated identifiers are always negative and so will never conflict with the user-specified identifiers which must be always positive.
See also
See Standard event identifiers for the list of standard identifiers available.
You can use ID_HIGHEST to determine the number above which it is safe to define your own identifiers. Or, you can use identifiers below ID_LOWEST. Finally, you can allocate identifiers dynamically using NewId () function too. If you use NewId () consistently in your application, you can be sure that your identifiers don’t conflict accidentally.

