For the French version of this tutorial click on the flag :
If you want to show the scrippy model, click
HERE.
For this scrippy which will allow you to obtain your own file SSC, you will need animated *gif and a glitter.
I chose this animated *gif :
and this glitter:
whose colours correspond well to that of the image gif.
The tutoriel refers, for the construction of the executives, to the dimensions of the file *gif which I used. You should so adapt measures to the dimensions of the file gif which you will choose.
PROCESS
1) Open your Scrippy and open a new virgin file (click the icon representing the blank page either make CTRL+N or still Row / new).
2) Place a first container by making Insert Insert/Container/Positioned Insert/Container/Positioned container with the following values:
-Horizontal Position from Center: 0 - Specified size ( specified size): 750.
-Vertical - Position from Center: 0 - Specified size ( specified size): 554.
3) Insert now a background: mark Use the selected color and click the compartment Set color to select the black colour.
4) Insert a new Positioned container with the following values:
-Horizontal - Position from Left: 10 - Specified size ( specified size): 265
-Vertical - Position from Pip: 10 - Specified size ( specified size): 256.
5) Insert now a background: click on browse to go to select your glitter. Then indicate the following values: Scrolling: No. scrolling; Autosize Image: tile; mark Layer with others objects. And all the other options have to be on 0.
6) Insert a new Positioned container of which the compartment should be indeed next size down of that of the previous background and this time time type 5 in each of the compartments of the right column Set left and right Edges, by moving so 5 with regard to the 4 sides of the previous container: Left position from left: 5; Right position from right: 5; from pip: 5; ....... from bottom: 5. It will allow the creation of the outline with glitter.
7) Click the compartment of the first background and make there a copy (Edit / copy background) and then take place with the cursor on the last one of accommodate (that of the Positioned container) and stick the background ( Edit / Paste Background). But this time, mark Layer with others objects (leave the compartment of the transparency on 0).
The other method for this point 7 of the tutoriel: make Insert / Background. Mark Use(wear out) the selected color and click the compartment Set color to select the black colour. Then mark Layer with others objects. the compartment of the transparency stays on 0.
8) Add a frame of colour black / style Groove/width.
9) Add then a topo line scroll (Insert / Scrolling line / topo to line scroll). Click Browse to go for your file gif (in my case, the gif angel - green). In Scroll direction(management), mark left. In Scroll speed put 100 pixels per the second and 10 pixels by mouve and mark Smooth scroll.
In Advanced Options, mark Overlap with next objects and put in Space between: 250 (the 2 other compartments are on the contrary 0).
10) Insert now Left Border scroll (Insert / Scrolling line / left to line scroll). Click Browse to go for your file gif (in my case, the gif angel - green). In Scroll direction(management), mark Up. In Scroll speed put 100 pixels per the second and 10 pixels by mouve and mark Smooth scroll.
In Advanced Options, mark Place over background and 3 compartments stay in 0.
11) Click the second positioned container (that of the point 4) and make there a copy. Then take place below the last one of compartments with the cursor and make Edit / Paste Positioned Container. You will note that automatically the compartments which were below the copied very container were so got back (6 compartments which depend on the container and which visually are slightly moved towards the right-hand side).
Move him(it) with the mouse so that it(he) is exactly in correspondence of the first Positioned container. It is so about a copy of the rectangle where are going to appear the angels. But one is going to give him(her) a different position on the space of the page: below to the right. So one is going to tick Right and Bottom (all the other values must be preserved).
You can give a look on what you obtained by clicking the compartment Preview.
Now one goes constuire bars except rectangles.
12) Insert another Positioned Container and place him(it) in correspondence of the precedent, but always in the heart of the list of present compartments until now. Give him(her) the following dimensions:
- Horizontal layout: from left: 165; specified size: 250;
- Vertical layout: From bottom: 285; specified size: 5.
13) Insert the background. Because we want again as background the higher already used glitter, we are going to click the small rectangle in the angle of the rectangle where apparaissaît the name of files and we are going to track down it and to select it. Scrolling: no scrolling; Auto-size embellishes with images: tile; Advanced options: do not mark anything and leave everything with 0.
14) Make a copy of this last one Positioned Container and stick it next size down of the other one. Give to it this time: left 25; size: 230; pip: 305; size: 5.
15) Made as in the point 14, but this time put these values: left 35; size: 210; pip: 325; size: 5.
We so completed 3 bars next size down of the rectangle at the top to the left.
16) Made as in the point 14, but this time put these values: right 290; size: 5; bottom: 15; size: 240.
17) Made as in the point 14, but this time put these values: right 310; size: 5; bottom: 25; size: 220.
18) Made as in the point 14, but this time put these values: right 330; size: 5; bottom: 30; size: 200. We so completed 3 vertical bars next to the rectangle below to the right.
It remains only to add the sound ( sound), the ticker, the message area (set the margins: left 480 and the rest on 20) and the loading message.
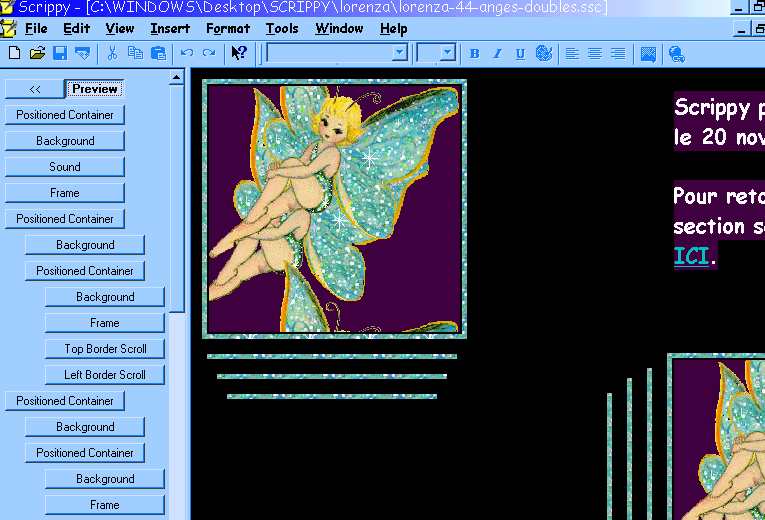
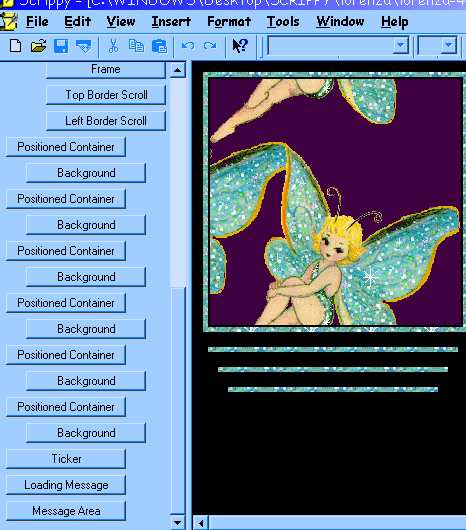
The following 2 images have to help you well to place compartments :
This tutoriel was created on November 23, 2002 in the context of the works of the French group - Scrippy, based by Mario Panone.
If you want following information about this group click the logo: