COLORATED DIVIDERS
For the French version of this tutorial, click the flag

If you want to see an example of scrippy created with the technique indicated in this tutorial click HERE.
PREPARATION OF THE MATERIAL
Prepare in Paint Shop Pro, 5 basic elements by following the following method:
1) Open in PSP a new file of 350 by 60 pixels, black background.
2) Select a different colour (for example the red) for the front - plan and for the background.
3) Click the tool Text and choose a letter of a police which allows you to have a rather long bar which could serve of division and at the same time decoration, as for example the letter P (Capital letter) of the Deco Dividers fonte which you can download HERE
All the letters of this font can be used for this tutorial.
Put size 36 and click on OK.
4) With the Mover, move selection letter towards the centre.
5) Edition / copy, then paste it as new image on your work plan.
6) Take the new copy (red) and place it as new copy on the black rectangle (where you will have first eliminated the selected letter). In this way the ornamental letter will be exactly in the centre of the black rectangle.
Merge All.
7) Double click with the dropper the letter to select it. If selection does not cover all the letter, Modify / select Selection / similar zones.
You can also select a little red part with the FreeHand and then Selections/ Modify / Select similar.
8) Layer / Convert to raster layer.
9) Type the touch CANC of your keyboard to eliminate selection.
10) Selections / Modify / contract. And write : 5.
11) Layer / New raster layer and fill it with the black colour by using the jar of painting.
12) Layers/ Merge/ Visible and save as optimized GIF by naming it motive 1.
The first ornamental motive is created.
13) Take the same hardly saved rectangle and make Image / Flip. Save it with another name (motive 2), always as gif optimized.
14) Take the same hardly saved rectangle and make Image / rotate - direction: right -hand side ; 90 °. Save it with another name (motive 3), always as optimized gif.
15) Take the same hardly protected rectangle and make Image/Mirror and save it with another name (motive 4), always as optimized gif.
You so obtained the 4 ornamental black rectangles which will serve for the circumferences of the realization.
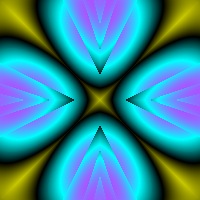
16) Choose a very colored tile (more colours you will have more realization will be suggestive. So enjoy looking for colours which please you) of 200 by 200 pixels having an effect which repeats on 4 sides. It is possible to create it with the filter Ulead / art texture. Here is the one that I created myself and I used in my realization:
WITH SCRIPPY
Here is the order of the main compartments for this tutorial :
1) Open in the Scrippy software a new document: File / New; either click the corresponding icon. Insert a background: Insert / background and select the black colour.
2) Insert / Positioned Container and leave it in this position.
In the first column of the window which opens: in Horizontal Layout: Set Position and Widht, From Left: 0; Specified size: 60 (it is the width of a constructed decoration before in Paint Shop Pro).
In Vertical layout, in the second column, put From Top: 0 and From Bottom: 0.
The 2 backgrounds which we are going to add will depend on this container: they will be so placed one on the other one in a very parallel way.
3) Insert Insert/ background: 200 by 200 pixels click Browse to find your tile colored.
Put Scrolling: Down+Left; Pixels per the Second: 100; Pixels per move: 1. Fast Scroll: marked.
In Advanced options mark Layer with other objects.
4) Insert/ background: click Browse to find your file gif black background with the motive 1 (it will be used for the left of the stat).
Put Scrolling: Up; Pixels per the Second: 100; Pixels per move: 1. Fast Scroll: marked.
In Advanced options mark Layer with other objects.
5 - 7) Click the compartment 2 and make Edit / Positioned Container. Take place on the compartment 6, then click Paste. Then move the compartment of the container completely towards the left (hold the left key of the mouse rested to make it).
Change in the compartment 5: mark Right. In the compartment 7, Scrolling: Down and select your file gif - motive 2 (the one that is used to the right).
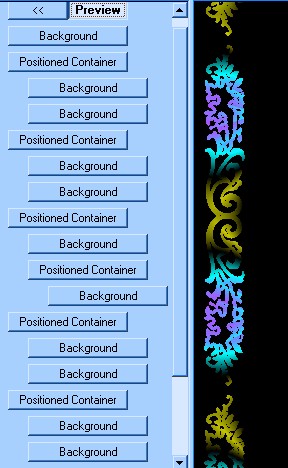
Click Preview: you should see an ascending motive on the left and a downward motive on the right-hand side with a got game of colours speaks passage of the tile used next size down by the transparency of the motive.
We are going now to build central part including the message area and the decorations on the high and low part.
8) Insert / Positioned Container: and complete in the second column: From Left: 150; From Right: 150; From Top: 50; From Bottom: 50.
9) Insert / Background: click Browse to find the colored tile with the size of 200 by 200 pixels.
Put Scrolling: Down+Left; Pixels per the Second: 100; Pixels per move: 1. Fast Scroll: marked.
In Advanced options mark Layer with other objects.
10) Insert / Positioned Container and in the second column, mark: Left 3; Right: 3; Pip: 3 and Bottom: 3. (It is the colored margin that we are going to build for the message area).
11) Insert / background and select the black colour. It will be used as background of the message.
12) Insert / Positioned Container and put it completely to the left.
In Horizontal Layout ( second column): From Left: 153; From Right: 153 (it is the width of the lateral margin and the edge colored with the message area).
In Vertical layout, in the first column, put From Top: 53 and Specified Size: 60.
The 2 backgrounds which we are going to add will depend on this container: they will be so placed one on the other one in a very parallel way.
13) Insert/ background: click Browse to go for your colored tile with the size of 200 by 200 pixels .
Put Scrolling: Up+Left; Pixels per the Second: 100; Pixels per move: 1. Fast Scroll: marked.
In Advanced options mark Layer with other objects.
14) Insert/ background: click Browse to find the file gif black bottom with the motive 3 (the one that will be used for the top of the Message area).
Put Scrolling: Left; Pixels per the Second: 100; Pixels per move: 1. Fast Scroll: marked.
In Advanced options mark Layer with other objects.
15 - 17) Click the compartment 12 and make Edit / Positioned Container. Take place on the compartment 14, then click Paste. Then move the compartment of the container completely towards the left (hold the left key of the mouse rested to make it).
In the compartment 15, mark Bottom. In the compartment 17, select fourth ornamental motive and in Scrolling, put Left.
18) Insert / Message Area and put this compartment completely to the left.
We are going to calculate distances well to put the message between various effects and so that the space of the message adapts itself according to the length the wrote message. Here are the good measures of margins according to the measures of the other elements: Left: 170; Right: 170; Top: 130 (height of the main motive and a little of margin above and next size down); Bottom: 130.
Mark Override Scrollbar color and choose 2 colours in accordance with the other colours of the realization. You can choose one of the colours of the tile with the dropper in Paint Shop Pro.
You can complete by adding a sound ( music), a loading message and a ticker.
Save your realization as file SSC or as file HTML.
******************
This tutoriel was created on May 05, 2003 in the context of the works of the group Franco-scrippy, based by Mario Panone.
If you want following information about this group click the logo:
If you want to join this group, click HERE.
Good amusementl!
Lorenza
P. : If you want to write to me to have supplementary information or to suggest advices, click If you want to write to me to have supplementary information or to suggest advices, click HERE
.