PREPARATION OF THE MATERIAL
To realize this scrippy you will need only a glitter, as this one:
glitter, comme celui-ci:
You can find the others of it
HERE, the site of glitters.
If you want you will be able to create it yourselves by following processes indicated HERE.
You will also need a background which you will be able to realize in a free way with your Paint Shop Pro software by leaving of one of the images of your choice.
For my background, I left of an image which I have redimensionnée and to which I added a new copy where I paid of the white colour with the tool jar of painting and I put about 50 % of opaqueness in the window of copies, then having merged copies, I applied twice the filter seamless tile of FM TILE TOOLS (once Vertical marked and once Vertical not marked). To end, I applied Texturizer , Scaling's filter Canvas: 100 %, Relief: value 2 and direction: Top Right. Finally I protected in the size *jpg.
But naturally it is only the thorough example that one can create.
INSTALLATION OF THE STATIONERY
Open your Scrippy software and click the icon representing a blank page. In the window which will open, click on OK.
1) Make Insert Insert/Container/ Insert/Container/ Insert/Container/ Positioned Container and you will complete part to the left by putting the following values:
-Horizontal Layout: Set Position and Width: Position from Center: O; Specified Size: 800
-Vertical Layout: Set Position and With: Position from Center: 0; Specified Size: 650
2) Make Insert / Background. Click Browse to go to look for your background. Scrolling: No. scrolling. And do not change any other option (no word marked in Advanced options and everything has to stay in 0).
3) Make Insert Insert/Container/ Insert/Container/ Insert/Container/ Positioned Container and you will complete part to the left by putting the following values:
-Horizontal Layout: Set Position and Width: Position from Left: 20; Specified Size: 10
-Vertical Layout: Set Position and With: Position from Top: 0; Specified Size: 20
4) Make Insert / Background. Click Browse to go to look for your glitter. Scrolling: Down. Pixels per second: 10; pixels per move: 1: Smoll scroll: marked.
And do not change any other option (no word marked in Advanced options and everything has to stay in 0).
5) Make Insert / frame and give he the following values: Style: groove; with: 1; colour: black.
6) Make Insert Insert/Container/ Insert/Container/ Insert/Container/ Positioned Container and you will complete part to the left by putting the following values:
-Horizontal Layout: Set Position and Width: Position from Left: 50; Specified Size: 10
-Vertical Layout: Set Position and With: Position from Top: 0; Specified Size: 50
7) Make Insert / Background. In the compartment Browser, click the small right triangle of the compartment of the search and select your glitter (it is not necessary to go to look for it in the file : it is already inserted into this pop-up menu). Keep the same values as in the previous point: Scrolling: Down, Pixels per second: 10; pixels per move: 1: Smoll scroll: marked.
And do not change any other option (no word marked in Advanced options and everything has to stay in 0).
8) Make Insert / frame and give he the following values: Style: groove; with: 1; colour: black.
If you prefer, use this other process: take place on the first frame, and make Edit / copy frame. Then take place on the last one of compartments and make Edit / paste frame.
9) Make Insert Insert/Container/ Insert/Container/ Insert/Container/ Positioned Container and you will complete part to the left by putting the following values:
-Horizontal Layout: Set Position and Width: Position from Left: 80; Specified Size: 10
-Vertical Layout: Set Position and With: Position from Top: 0; Specified Size: 20
10) Make Insert / Background. Make exactly as in the point 7.
11) Make Insert / frame, exactly as for the point 8.
12) Make Insert Insert/Container/ Insert/Container/ Insert/Container/ Positioned Container and you will complete part to the left by putting the following values:
-Horizontal Layout: Set Position and Width: Position from Left: 0; Specified Size: 50
-Vertical Layout: Set Position and With: Position from Top: 20; Specified Size: 10
13) Make Insert / Background. Made exactly as in the point 7, but in Scrolling, choose Right.
14) Make Insert / frame, exactly as for the point 8.
15) Make Insert Insert/Container/ Insert/Container/ Insert/Container/ Positioned Container and you will complete part to the left by putting the following values:
-Horizontal Layout: Set Position and Width: Position from Left: 60; Specified Size: 740
-Vertical Layout: Set Position and With: Position from Top: 20; Specified Size: 10
16) Make Insert / Background. Made exactly as in the point 7, but in Scrolling, choose Right.
17) Make Insert / frame, exactly as for the point 8.
18) Make Insert Insert/Container/ Insert/Container/ Insert/Container/ Positioned Container and you will complete part to the left by putting the following values:
-Horizontal Layout: Set Position and Width: Position from Left: 20; Specified Size: 10
-Vertical Layout: Set Position and With: Position from Top: 30; Specified Size: 50
19) Make Insert / Background. Make exactly as in the point 7. In Scrolling, choose Down.
20) Make Insert / frame, exactly as for the point 8.
21) Make Insert Insert/Container/ Insert/Container/ Insert/Container/ Positioned Container and you will complete part to the left by putting the following values:
-Horizontal Layout: Set Position and Width: Position from Left: 80; Specified Size: 10
-Vertical Layout: Set Position and With: Position from Top: 30; Specified Size: 50
22) Make Insert / Background. Make exactly as in the point 7. In Scrolling, choose Down.
23) Make Insert / frame, exactly as for the point 8.
24) Make Insert Insert/Container/ Insert/Container/ Insert/Container/ Positioned Container and you will complete part to the left by putting the following values:
-Horizontal Layout: Set Position and Width: Position from Left: 0; Specified Size: 20
-Vertical Layout: Set Position and With: Position from Top: 50; Specified Size: 10
25) Make Insert / Background. Make exactly as in the point 7. In Scrolling, choose Right.
26) Make Insert / frame, exactly as for the point 8.
27) Make Insert Insert/Container/ Insert/Container/ Insert/Container/ Positioned Container and you will complete part to the left by putting the following values:
-Horizontal Layout: Set Position and Width: Position from Left: 30; Specified Size: 50
-Vertical Layout: Set Position and With: Position from Top: 50; Specified Size: 10
28) Make Insert / Background. Make exactly as in the point 7. In Scrolling, choose Right.
29) Make Insert / frame, exactly as for the point 8.
30) Make Insert Insert/Container/ Insert/Container/ Insert/Container/ Positioned Container and you will complete part to the left by putting the following values:
-Horizontal Layout: Set Position and Width: Position from Left: 90; Specified Size: 710
-Vertical Layout: Set Position and With: Position from Top: 50; Specified Size: 10
31) Make Insert / Background. Make exactly as in the point 7. In Scrolling, choose Right.
32) Make Insert / frame, exactly as for the point 8.
33) Make Insert Insert/Container/ Insert/Container/ Insert/Container/ Positioned Container and you will complete part to the left by putting the following values:
-HorizontalLayout: Set Position and Width: Position from Left: 0; Specified Size: 50
-Vertical Layout: Set Position and With: Position from Top: 80; Specified Size: 10
34) Make Insert / Background. Make exactly as in the point 7. In Scrolling, choose Right.
35) Make Insert / frame, exactly as for the point 8.
36) Make Insert Insert/Container/ Insert/Container/ Insert/Container/ Positioned Container and you will complete part to the left by putting the following values:
-Horizontal Layout: Set Position and Width: Position from Left: 50; Specified Size: 10
-vertical Layout: Set Position and With: Position from Top: 60; Specified Size: 640
37) Make Insert / Background. Make exactly as in the point 7. In Scrolling, choose Down.
38) Make Insert / frame, exactly as for the point 8.
39) Make Insert Insert/Container/ Insert/Container/ Insert/Container/ Positioned Container and you will complete part to the left by putting the following values:
-Horizontal Layout: Set Position and Width: Position from Left: 60; Specified Size: 740
-Vertical Layout: Set Position and With: Position from Top: 80; Specified Size: 10
40) Make Insert / Background. Make exactly as in the point 7. In Scrolling, choose Right.
41) Make Insert / frame, exactly as for the point 8.
42) Make Insert Insert/Container/ Insert/Container/ Insert/Container/ Positioned Container and you will complete part to the left by putting the following values:
-Horizontal Layout: Set Position and Width: Position from Left: 20; Specified Size: 10
-vertical Layout: Set Position and With: Position from Top: 90; Specified Size: 610
43) Make Insert / Background. Make exactly as in the point 7. In Scrolling, choose Down.
44) Make Insert / frame, exactly as for the point 8.
45) Make Insert Insert/Container/ Insert/Container/ Insert/Container/ Positioned Container and you will complete part to the left by putting the following values:
-HorizontalLayout: Set Position and Width: Position from Left: 80; Specified Size: 10
-Vertical Layout: Set Position and With: Position from Top: 90; Specified Size: 610
46) Make Insert / Background. Make exactly as in the point 7. In Scrolling, choose Down.
47) Make Insert / frame, exactly as for the point 8.
We stopped so making the plait with the 3 sorts of bars on the height and on the left. Let us cross now to build the space for the message:
48) Make Insert Insert/Container/ Insert/Container/ Insert/Container/ Positioned Container and you will complete part to the left by putting the following values:
-Horizontal Layout: Set Position and Width: Position from Right: 20; Specified Size: 500
-vertical Layout: Set Position and With: Position from Bottom: 20; Specified Size: 200
49) Make Insert / Background. Make exactly as in the point 7. In Scrolling, choose No. scrolling.
50) Make Insert / frame, exactly as for the point 8.
51) Make Insert Insert/Container/ Insert/Container/ Insert/Container/ Positioned Container (the compartment should well be moved towards the right-hand side because it is internal in the previous Container: look at the second arrest below) and you will complete part to the right by putting the following values:
-mark Set Left and Right Edges and put:
From Left: 8
From Right: 8
Mark Set Top and Bottom Edges and put:
From Top: 8
From Bottom: 8
52) Make Insert / Background. Select your background and put the following values: in Scrolling, choose Down + Left: marked Smooth scroll; Pixels per second: 100; pixels per move: 10; Mark the compartment Layer with others objects and put 10 in Transparency. The other compartments stay in 0.
53) Make Insert / frame, exactly as for the point 8.
54) Insert Message Area and for margins put 10 for every side.
You have only to complete by putting a loading message, a tiker and of the music ( sound ).
On the whole, so , in my scrippy there are exactly 57 compartments.
************
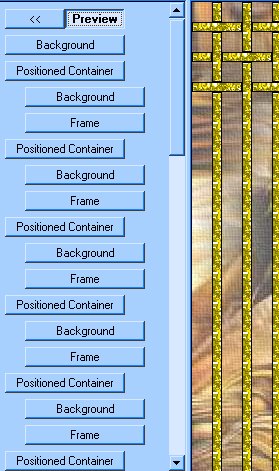
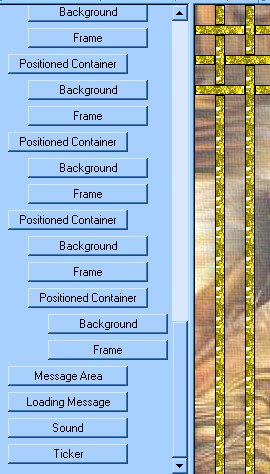
To help you well to place containers, here is arrests of images of 2 parts of the compartments of the scrippy:
First part of compartments
Final part of compartments
The intermediate compartments have the same disposal as those of the first part.
As a matter of fact all the containers on parallels(parallel lines) some with regard to the others and every some below the others, except that of the internal container of the container of the Message area: it(he) must be so moved towards the right-hand side so that it(he) is internal.
******************
This tutorial was created on December 07, 2002 in the context of the works of the French group - Scrippy, based by Mario Panone.
If you want following information about this group click the logo:
If you want to join this group, click
HERE.
Check amusementl!
Lorenza
P. S. : if you want to write to me to have supplementary information or to suggest advices, click
HERE
.