FRAME GLITTER
For the English version of this tutoriel, click the flag:

If you want to see an example of scrippy created with the technique indicated in this tutoriel, click HERE.
PREPARATION OF THE MATERIAL
Prepare the following 3 elements:
1) An image of your choice which you will treat in your Paint Shop Pro to eliminate any demarcation on four sides: with the filter seamless tile of FM TILE TOOLS either with the filter Mosaic without joint in PSP 8
In my case, I gave him(her) the following dimensions: 800 by 965 pixels.
2) Two glitters of your choice. Here is the one that I used for my realization:
A link for glitters: HERE .
WITH SCRIPPY
1) Open in the Scrippy software a new document: File/ New either click the corresponding icon. Insert a background of your choice: Insert / background and insert the paper created first in PSP.
2) Insert / Positioned container and complete in the second column: From Left: 0; From Right: 0; From Top: 0; From Bottom: 0.
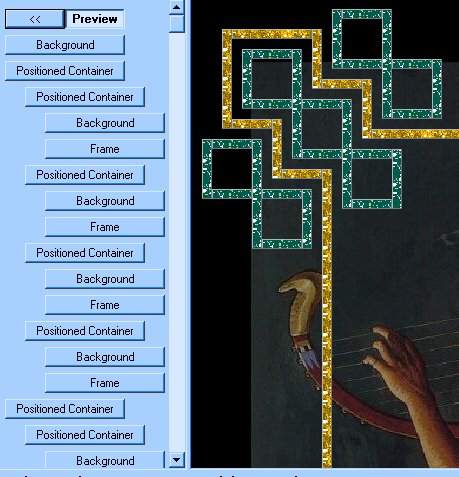
It is the positioned in 0, very convenient to make groupings of positioned containers which they will be placed in precise places of the realization, as you can see in the arrest below which represents the first part of the compartments of this realization:
3) Insert / Positioned container (it will remain moved towards the right-hand side with regard to the precedent) In Horizontal Layout, mark Set Position and Widht (it is the first column which will be completed):: From left: 50; Specified size: 10.
In Vertical Layout, Set Position and Height: from Top: 50; specified size: 60.
4) Insert Insert/ background: and one is going to select as background the glitter (glitter 1) In Scrolling, put No Scrolling.
5) Insert / frame. I chose: Style: groove; widht: 1; colour: of your choice (a colour which gets loose from that of the glitter and your thorough paper (in my case, I chose this one: #E9F3FD). To you to choose the values which seem to you the best adapted to your global project.
6-8) We are going to begin to copy and paste
. Click the compartment 3, and make Edit / Copy positioned container. Click the compartment 5 and click the icon Paste.
With the mouse pressed on the touch 6, move it towards the left in correspondence of the compartment 3.
In the compartment 6, modify only Right (instead of Left) so you will have Right and Top.
9-11) Repeat the previous phase, and now mark Bottom ........ so you have Left and Bottom.
12-14) Repeat the previous phase, and now mark Right and Bottom.
This first grouping allows to have a small rectangle with glitter which repeats in the 4 angles of the composition. Click Preview to see them.
15-27) Now copy and paste the compartment 2. Let us put it very completely to the left.
Modify the measures in the 4 internal positioned containers . Put the following ones: 100/10/50/110. 28-40) Copy again and paste the compartment 2. Let us drag, with the mouse, the compartment 28 completely to the left in the system of compartments.
Here is the values to put in the 4 internal positioned containers: 150/10/100/110.
41-53) Copy again and paste the compartment 2. Let us drag, with the mouse, the compartment 41 completely to the left in the system of compartments.
Here is the values to put in the 4 internal positioned containers: 200/10/150/60.
54-66) Copy again and paste the compartment 2. Let us drag, with the mouse, the compartment 54 completely to the left in the system of compartments.
Here is the values to put in the 4 internal positioned containers: 60/40/50/10. 67-79) Copy again and paste the compartment 2. Let us drag, with the mouse, the compartment 67 completely to the left in the system of compartments.
Here is the values to put in the 4 internal positioned containers: : 60/40/100/10.
89-101) Copy again and paste the compartment 2. Let us drag, with the mouse, the compartment 89 completely to the left in the system of compartments.
Here is the values to put in the 4 internal positioned containers: : 110/40/100/10.
102-114) Copy again and paste the compartment 2. Let us drag, with the mouse, the compartment 102 completely to the left in the system of compartments.
Here is the values to put in the 4 internal positioned containers: : 110/40/150/10.
115-127) Copy again and paste the compartment 2. Let us drag, with the mouse, the compartment 115 completely to the left in the system of compartments.
Here is the values to put in the 4 internal positioned containers : 160/40/150/10.
128-140) Copy again and paste the compartment 2. Let us drag, with the mouse, the compartment 128 completely to the left in the system of compartments.
Here is the values to put in the 4 internal positioned containers: 160/40/200/10.
141-153) Copy again and paste the compartment 2. Let us drag, with the mouse, the compartment 141 completely to the left in the system of compartments.
Here is the values to put in the 4 internal positioned containers: 120/10/30/60 dans les 4 positioned containers internes.
Put the glitter 2.
154-166) Copy again and paste the compartment 2. Let us drag, with the mouse, the compartment 154 completely to the left in the system of compartments.
Here is the values to put in the 4 internal positioned containers: 130/40/80/10.
Put the glitter 2.
167-179) Copy again and paste the compartment 2. Let us drag, with the mouse, the compartment 167 completely to the left in the system of compartments.
Here is the values to put in the 4 internal positioned containers: 170/10/80/60.
Put the glitter 2.
180-192) Copy again and paste the compartment 2. Let us drag, with the mouse, the compartment 180 completely to the left in the system of compartments.
Here is the values to put in the 4 internal positioned containers: 40/40/120/10.
Put the glitter 2.
193-205) Copy again and paste the compartment 2. Let us drag, with the mouse, the compartment 193 completely to the left in the system of compartments.
Here is the values to put in the 4 internal positioned containers: 80/10/120/60.
Put the glitter 2.
206-218) Copy again and paste the compartment 2. Let us drag, with the mouse, the compartment 206 completely to the left in the system of compartments.
Here is the values to put in the 4 internal positioned containers: 90/40/170/10.
Put the glitter 2.
219-231) Copy again and paste the compartment 2. Let us drag, with the mouse, the compartment 219 completely to the left in the system of compartments.
Here is the values to put in the 4 internal positioned containers : 140/10/10/60.
232-244) Copy again and paste the compartment 2. Let us drag, with the mouse, the compartment 232 completely to the left in the system of compartments.
Here is the values to put in the 4 internal positioned containers : 150/40/10/10.
245-257) Copy again and paste the compartment 2. Let us drag, with the mouse, the compartment 245 completely to the left in the system of compartments.
Here is the values to put in the 4 internal positioned containers : 150/40/60/10.
258-270) Copy again and paste the compartment 2. Let us drag, with the mouse, the compartment 258 completely to the left in the system of compartments.
Here is the values to put in the 4 internal positioned containers : 190/10/10/110.
271-283) Copy again and paste the compartment 2. Let us drag, with the mouse, the compartment 271 completely to the left in the system of compartments.
Here is the values to put in the 4 internal positioned containers : 200/40/60/10.
284-296) Copy again and paste the compartment 2. Let us drag, with the mouse, the compartment 284 completely to the left in the system of compartments.
Here is the values to put in the 4 internal positioned containers : 200/40/110/10.
297-309) Copy again and paste the compartment 2. Let us drag, with the mouse, the compartment 297 completely to the left in the system of compartments.
Here is the values to put in the 4 internal positioned containers: 240/10/60/60.
310-322) Copy again and paste the compartment 2. Let us drag, with the mouse, the compartment 310 completely to the left in the system of compartments.
Here is the values to put in the 4 internal positioned containers : 60/10/140/110.
323-335) Copy again and paste the compartment 2. Let us drag, with the mouse, the compartment 323 completely to the left in the system of compartments.
Here is the values to put in the 4 internal positioned containers : 20/40/140/10.
336-348) Copy again and paste the compartment 2. Let us drag, with the mouse, the compartment 336 completely to the left in the system of compartments.
Here is the values to put in the 4 internal positioned containers : 20/40/190/10.
349-361) Copy again and paste the compartment 2. Let us drag, with the mouse, the compartment 349 completely to the left in the system of compartments.
Here is the values to put in the 4 internal positioned containers : 70/40/190/10.
362-374) Copy again and paste the compartment 2. Let us drag, with the mouse, the compartment 362 completely to the left in the system of compartments.
Here is the values to put in the 4 internal positioned containers : 70/40/240/10.
375-387) Copy again and paste the compartment 2. Let us drag, with the mouse, the compartment 375 completely to the left in the system of compartments.
Here is the values to put in the 4 internal positioned containers : 110/10/190/60.
386-398) Copy again and paste the compartment 2. Let us drag, with the mouse, the compartment 386 completely to the left in the system of compartments.
Here is the values to put in the 4 internal positioned containers : 10/10/140/60.
399-411) Copy again and paste the compartment 2. Let us drag, with the mouse, the compartment 399 completely to the left in the system of compartments.
Here is the values to put in the 4 internal positioned containers : 30/10/30/100.
Mettez le glitter 2.
412-424) Copy again and paste the compartment 2. Let us drag, with the mouse, the compartment 412 completely to the left in the system of compartments.
Here is the values to put in the 4 internal positioned containers : 40/80/30/10.
Mettez le glitter 2.
The 4 angles are completed. Now wee are to build the vertical and horizontal bars which will allow to connect 4 angles.
425-437) Copy again and paste the compartment 2. Let us drag, with the mouse, the compartment 425 completely to the left in the system of compartments.
Here is values to be put in the 4 positioned internal containers:
-In the first: column 2: Left 180; Right 180; column 1: Top 130; Size: 10.
-In the second: column 2: Left 180; Right 180; column 1: Bottom 130; Size: 10.
-In the third: column 1: Right 130; Size: 10; column 2: Top 170; Bottom: 170.
-In the fourth: column 1: Left 130; Size: 10; column 2: Top 170; Bottom: 170.
Put the glitter 2.
438) Insert / Message Area : put it very to the left in the list of compartments.
Because that it is necessary to take into account the width of the containers of the lateral strips, here is the good margins of the Message area: From Left: 160; From Right: 160; From Top: 220; From Bottom: 220.
Let us not forget to put colours in Scrollbar by marking Overrid Scrollbar color and by choosing 2 colours in accordance with the other colours of the realization.
You can complete by adding a sound ( music), a loading message and a ticker.
Save your realization as file SSC or as file HTML.
******************
This tutoriel was created on October 25, 2003 in the context of the works of the French group - Scrippy, founded by Mario Panone.
If you want following information about this group click the logo:
If you want to join this group, click HERE.
Good amusementl!
Lorenza
P.: if you want to write to me to have supplementary information or to suggest advices, click HERE .

|

|

|
 |